I'm always amazed at how quickly time flies when you have a busy life and a project like this truck.
I'm relatively new to the ways of California, so I took my truck down to the place we use for all of our emissions.
The scores were outstanding. And it FAILED due to visual.
1. Timing was advanced 5 degrees more than the factory settings (duh)
2. I had left the boost controller inline, even though boost is only 6.5psi max (factory) with it. Yes, new project.
3. It was missing an important smog valve, and the bracket.
After rectifying those things, I was good to go.
This morning, AAA made the DMV trip easy, literally 3 minutes in and out.
We spent the day running around and playing in the mud left behind from yesterday's rain storm. I did my best to drown it, but it wouldn't do it. Awesome!
Here's the aftermath, including some relatively clean puddles cleaning the goopy mud off. The front tires sticking outside the fenders means you want to keep the windows UP! LOL
It's been a couple of years since I had a 4x4 I could play in the rocks with. I'm taking the opportunity to build this one with my kids!
Saturday, November 5, 2011
Sunday, September 18, 2011
Fuel gauge is good. A working one is better!
My fuel gauge has, for some time, read empty after about 100 miles.
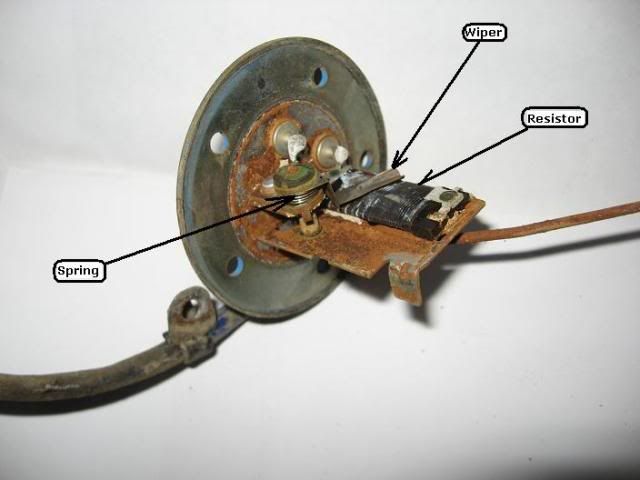
Turns out it's pretty common due to the design. Pics below are not of mine, mine has no rust, being a California truck.
I was bummed, however, that there were no parts fiches available online. Turns out that may be 100% due to Toyota limiting access. How unfortunate that's their position. See the December 2009 note here
I thought I could fix mine. Bzzzzt. It was even more hacked than the one above.
Looks like I need a part # 83320‑39735, which appears to be dealer-only. Since it's Sunday, looks like I'll be leaving the truck sitting until the part comes in since I'd rather not R&R the tank again.
http://www.toyodiy.com/parts/p_U_198610_TOYOTA_4RUNNER+TRUCK_RN61LG-PGZA_8401.6.html?hl=83320
If this part is not available (bites knuckles), I may have to figure one out.
The resistance of a Toyota sending unit is 3 plus 2 or minus 3 ohms (full) to 110 plus or minus 7.7 ohms (empty). Basically any ohmic readings from 0 to 117.7 ohms (full to empty) on a Toyota sending unit are within spec.
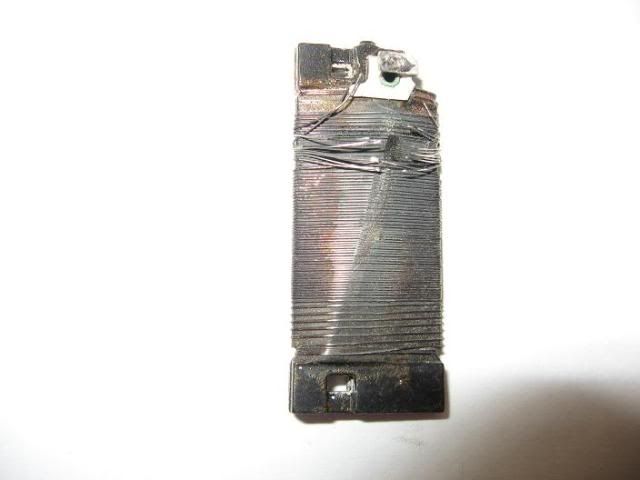
Turns out it's pretty common due to the design. Pics below are not of mine, mine has no rust, being a California truck.
I was bummed, however, that there were no parts fiches available online. Turns out that may be 100% due to Toyota limiting access. How unfortunate that's their position. See the December 2009 note here
The resistor wire wears through after years of wear as gas sloshes around in the tank:
I thought I could fix mine. Bzzzzt. It was even more hacked than the one above.
Looks like I need a part # 83320‑39735, which appears to be dealer-only. Since it's Sunday, looks like I'll be leaving the truck sitting until the part comes in since I'd rather not R&R the tank again.
| 83320 | GAGE ASSY, FUEL SENDER | ||
| 83320‑39735 | RN61..SRT, FUEL TANK:65LITER | 1 | $97.85 |
http://www.toyodiy.com/parts/p_U_198610_TOYOTA_4RUNNER+TRUCK_RN61LG-PGZA_8401.6.html?hl=83320
If this part is not available (bites knuckles), I may have to figure one out.
The resistance of a Toyota sending unit is 3 plus 2 or minus 3 ohms (full) to 110 plus or minus 7.7 ohms (empty). Basically any ohmic readings from 0 to 117.7 ohms (full to empty) on a Toyota sending unit are within spec.
Saturday, August 27, 2011
She runs like the wind again!
So it did in fact turn out to be a TPS.
When I searched for "22re surge" or "22rte surge" I didn't get hits with answers. So many of the page hits I was getting all talked about a funky idle, which I was not seeing.
So I changed by search to "22re surge -idle"
Red herring.
I picked 22RE instead of 22RTE since I figured the turbo wasn't relevant. This part was correct.
Turns out "22re miss" or "22re hesitation" worked much better. I finally found a page which both seemed to describe my issue AND had an answer - TPS.
I used 4Crawler's excellent site to troubleshoot the issue:
Toyota 2.4L/3.0L Throttle Position Sensor
Turns out this was the TPS. Measurements between IDL and E2 showed it had a problem, as did the ECU, throwing a code 7. And, because it's a turbo, it also blinked 14 times, which is very different than how it provides other codes (1 flash, pause, 4 flash is what I would have expected). Blinking 14 times is... Turbo overboost. Yep, I know all about that. >:)
Some quick comparisons of how it runs with the new TPS compared to what it's been doing for the past few weeks:
1. It's back to being as powerful as I expected
2. It goes up steep hills in OD again, doesn't need me to shift it down to 3rd.
3. The sproingy shifts into 3 and OD went away.
4. Gas MPG is... well, that verdict is out still. My last tank was 13.5, so I'm REALLY hoping to see 17 on this one. Or more is good!
Adjusting or Replacing the TPS
Carquest in town both stocked the part, and also had a great price.
It was 99 degrees out here today, but also quite humid. It doesn't help that I have a pin backing out of my ankle. I spent most of the day on the couch with my foot up. It's not unmanageable, but I do feel it. Surgery is Wednesday.
You get one guess which pin (aka screw) it is. :)

Since it's hot and I'm not into moving a lot at the moment anyways, I didn't get to working on it until after dark. This means no pictures.
I would have gotten to it sooner, but I had to run and get the part and close out a few honey-do's.
4Crawler's site above has some pics, but let me add some additional detail.
Last Christmas, the kids and wife got me a great LED headlight from Brookstone. I usually think they're overpriced on most of their stuff, but this headlamp has been awesome. It angles from straight ahead to 90 degrees down with positive detents, has a bright, low-beam, and SOS setting, and seems to run just about forever on 3 AAA batteries. I totally dig it. It sure beats sitting there with a AA (or D!) Mag Lite in your mouth! LOL
The TPS uses 2 philips screws to hold it on. There is no way you're going to get to the bottom one without some work. 4Crawler sells allen screws, in case you want to use a wobble allen to adjust it in the future. I don't expect to touch mine again until it goes bad.
To get to the bottom screw, you have to remove the throttle-body. It's pretty straightforward - 3 vacuum hoses, move the temperature sensor wire out of the way (remove it, don't forget to reinstall it!)
If you have a turbo using the stock metal pipe like I do (I don't have a CT20, instead my metal pipe was extended to fit the TEC turbo by welding in a new section), pull the intake-tube boot at the throttle body. I assume for normally aspirated trucks there's enough flex, but it most likely will be easier to just pull the intake boot too.
The trick with the boot on a turbo is to lubricate the metal pipe behind the boot, loosen the boot, and twist/slide it up the tube, rotate it about 180 degrees (throttle-body opening towards the front of the truck), then take it off.
Pull the accelerator cables (pedal, cruise) out of the throttle-cam.
There are 3 12mm bolts holding the throttle body on. The lower-left is a stud with a 12mm nut on it. Break all 4 loose and given them a little slack, then pull the 3 bolts out.
Remove the nut, and the 4th vacuum line under the TPS.
You can now loosen the two TPS screws if you're just doing an adjustment. Or, if you're replacing it, you're good to go.
Good luck!
When I searched for "22re surge" or "22rte surge" I didn't get hits with answers. So many of the page hits I was getting all talked about a funky idle, which I was not seeing.
So I changed by search to "22re surge -idle"
Red herring.
I picked 22RE instead of 22RTE since I figured the turbo wasn't relevant. This part was correct.
Turns out "22re miss" or "22re hesitation" worked much better. I finally found a page which both seemed to describe my issue AND had an answer - TPS.
I used 4Crawler's excellent site to troubleshoot the issue:
Toyota 2.4L/3.0L Throttle Position Sensor
Turns out this was the TPS. Measurements between IDL and E2 showed it had a problem, as did the ECU, throwing a code 7. And, because it's a turbo, it also blinked 14 times, which is very different than how it provides other codes (1 flash, pause, 4 flash is what I would have expected). Blinking 14 times is... Turbo overboost. Yep, I know all about that. >:)
Some quick comparisons of how it runs with the new TPS compared to what it's been doing for the past few weeks:
1. It's back to being as powerful as I expected
2. It goes up steep hills in OD again, doesn't need me to shift it down to 3rd.
3. The sproingy shifts into 3 and OD went away.
4. Gas MPG is... well, that verdict is out still. My last tank was 13.5, so I'm REALLY hoping to see 17 on this one. Or more is good!
Adjusting or Replacing the TPS
Carquest in town both stocked the part, and also had a great price.
It was 99 degrees out here today, but also quite humid. It doesn't help that I have a pin backing out of my ankle. I spent most of the day on the couch with my foot up. It's not unmanageable, but I do feel it. Surgery is Wednesday.
You get one guess which pin (aka screw) it is. :)
Since it's hot and I'm not into moving a lot at the moment anyways, I didn't get to working on it until after dark. This means no pictures.
I would have gotten to it sooner, but I had to run and get the part and close out a few honey-do's.
4Crawler's site above has some pics, but let me add some additional detail.
Last Christmas, the kids and wife got me a great LED headlight from Brookstone. I usually think they're overpriced on most of their stuff, but this headlamp has been awesome. It angles from straight ahead to 90 degrees down with positive detents, has a bright, low-beam, and SOS setting, and seems to run just about forever on 3 AAA batteries. I totally dig it. It sure beats sitting there with a AA (or D!) Mag Lite in your mouth! LOL
The TPS uses 2 philips screws to hold it on. There is no way you're going to get to the bottom one without some work. 4Crawler sells allen screws, in case you want to use a wobble allen to adjust it in the future. I don't expect to touch mine again until it goes bad.
To get to the bottom screw, you have to remove the throttle-body. It's pretty straightforward - 3 vacuum hoses, move the temperature sensor wire out of the way (remove it, don't forget to reinstall it!)
If you have a turbo using the stock metal pipe like I do (I don't have a CT20, instead my metal pipe was extended to fit the TEC turbo by welding in a new section), pull the intake-tube boot at the throttle body. I assume for normally aspirated trucks there's enough flex, but it most likely will be easier to just pull the intake boot too.
The trick with the boot on a turbo is to lubricate the metal pipe behind the boot, loosen the boot, and twist/slide it up the tube, rotate it about 180 degrees (throttle-body opening towards the front of the truck), then take it off.
Pull the accelerator cables (pedal, cruise) out of the throttle-cam.
There are 3 12mm bolts holding the throttle body on. The lower-left is a stud with a 12mm nut on it. Break all 4 loose and given them a little slack, then pull the 3 bolts out.
Remove the nut, and the 4th vacuum line under the TPS.
You can now loosen the two TPS screws if you're just doing an adjustment. Or, if you're replacing it, you're good to go.
Good luck!
Thursday, August 25, 2011
She starts hesitating and hitching/surging
At the very same time I installed the gears, the 4Runner started hesitating when accelerating. It was like I was pushing and fully releasing the gas pedal, but very quickly.
It was also running less well than before the gears. Now when a truck with 4.10s and 33s seems more powerful than after installing 4.88s...
There were other indicators something was wrong:
Since it's easy, I decided to check for codes. The word is that, even if the Check Engine light is not on, you may have codes.
I'd never checked codes on this truck, so it was a learning process. Here's a couple tidbits I learned. :)
22RE's generate codes as Flash, flash, flash...pause...flash...pause,pause,pause...repeats (or next code).
It turns out 22RTE's generate some additional codes. A 14 is 14 flashes, not Flash...pause...flash,flash,flash,flash... it threw me for a second when it got past 9, then kept going... LOL
A quick check of the ECU codes showed two in memory.
Here's LC Engineering's thorough setup/verify/adjust procedure - you CANNOT just remove the old one and install the new one.
I'm checking on the right place to get a TPS now. I prefer OE parts, but they're sooo much more expensive. Time to ask my hookup at the local dealer if he can really hook me up! :)
I'll be surprised if it fixes the power issue, but we'll see.
I think it's amazing that these issues started at the same time I added gears. LOL
I'll report back on the outcome!
It was also running less well than before the gears. Now when a truck with 4.10s and 33s seems more powerful than after installing 4.88s...
There were other indicators something was wrong:
- The 4Runner would not go as fast down the highway as before the gears/lift. I expect this to some degree since there's a lot more air being pushed with the lift. But the truck feels like it's driving into a headwind as speeds go up, and 75-80 is harder than it should be. This thing ripped with 225/75R15s and 4.10s, which calculate out to the same as 33s and 4.88s - something's up.
- Further proof the 4.88s/33s are nearly the same as 225/15s - the speedo was accurate with the 225/4.10 combo, way low with 4.10/33s, and is now about 2mph high at 70 with 4.88s/33s. If anything, I now have a slight advantage.
- It doesn't go up hills any faster or more easily than with the 4.10s
- I could go up some hills at about 60 in Drive with 4.10s. The nearly 20% jump from 4.10s to 4.88s should mean I can run the same hill in OD (20% steeper than D). No way right now.
Since it's easy, I decided to check for codes. The word is that, even if the Check Engine light is not on, you may have codes.
I'd never checked codes on this truck, so it was a learning process. Here's a couple tidbits I learned. :)
22RE's generate codes as Flash, flash, flash...pause...flash...pause,pause,pause...repeats (or next code).
It turns out 22RTE's generate some additional codes. A 14 is 14 flashes, not Flash...pause...flash,flash,flash,flash... it threw me for a second when it got past 9, then kept going... LOL
A quick check of the ECU codes showed two in memory.
- 14 - Turbo overpressure (hit the fuel cut - and it had with the old cam after the dyno shop finished adjusting it)
- 7 - TPS no bueno
Here's LC Engineering's thorough setup/verify/adjust procedure - you CANNOT just remove the old one and install the new one.
I'm checking on the right place to get a TPS now. I prefer OE parts, but they're sooo much more expensive. Time to ask my hookup at the local dealer if he can really hook me up! :)
I'll be surprised if it fixes the power issue, but we'll see.
I think it's amazing that these issues started at the same time I added gears. LOL
I'll report back on the outcome!
Monday, August 15, 2011
Before and after picture montage
So... was all that work worth it?
When I bought it

After new tires

After the lift

Wheel stuffing
Before

After (doesn't stuff up as far)

How's the overall articulation? Remember the Before has the swaybar connected, the After does not.
Before

After

I think this shot tells a lot about what's going on with the suspension at the front and back.
The front goes up just as much - all the way to the bumpstops. One of the benefits of a long-travel kit.
The rear drops just as far as it did before - it's being limited by the shackle length. I need to extend the rear shackle to take full advantage of the rear lift.
Before

After

Front flex
Before (swaybar is installed)

After (no swaybar, long travel kit)

Rear flex
Before

After (stretches even more!)

When I bought it
After new tires

After the lift

Wheel stuffing
Before

After (doesn't stuff up as far)
How's the overall articulation? Remember the Before has the swaybar connected, the After does not.
Before

After
I think this shot tells a lot about what's going on with the suspension at the front and back.
The front goes up just as much - all the way to the bumpstops. One of the benefits of a long-travel kit.
The rear drops just as far as it did before - it's being limited by the shackle length. I need to extend the rear shackle to take full advantage of the rear lift.
Before

After
Front flex
Before (swaybar is installed)

After (no swaybar, long travel kit)
Rear flex
Before

After (stretches even more!)
The rear moves up in the world, joins the front and we're done!
I have to say the front of the truck was looking pretty good. I was eager to see what the rear would look like with a 'Zuk rear coil mod.
The driver's side took an hour to sort out as I wanted to be careful. The passenger side took about 25 minutes.
I was going to swap the rear brake line for a longer one, but it proved unnecessary AND I was running up against our deadline to get to the drag strip.
It's only 1/8 mile, but we got to watch some fast vehicles. Including this cool diesel which was chewing up and spitting out some street cars. High 90s and mid 7-seconds. Check out this video (sorry not inlined)
One of the things I wanted to change from the normal mod was to put something between the frame and the spring to manage any wear.
I ran out to a "local" steel place (is 32 miles away local?). They had some neat stuff, but one of the things I found was this base-plate. I cut the sides off so it would fit between the uprights of the bump stop.

Some of you will remember I used 14" 125# springs.

I started with the driver's side because it doesn't have all those scary brake lines, gas tank, etc. behind it. I figured do the easy side first.
Once I got the bumpstop cut off, I found I needed to trim the front upright a bit more, then bend them out with my very large Crescent wrench and my 3' cheater pipe. I bent them out so I could barely screw the spring in about 1/2-way. I wanted them to stay tight. They're a bit too tight, you can hear the springs sproinging (sliding in and out) when it stretches out and flexes. It turns out it's the coil below the bracket binding on the corner. I'll chamfer them.

The passenger side went MUCH faster. Be VERY careful around those brake lines with your Sawzall.
Here's how much I cut off the frame bump-stop thingy. Yes, it's a terrible picture (and backwards, compare to the pic above).

I removed the rear shock to allow the axle to drop as far as it can. Once I got it cut off, I inserted my bottle jack between the frame and the leaf. You can see my mondo-Crescent wrench. I still needed 3' of cheater pipe on it to bend the brackets without flame. Start in the middle so you give them a slight-round profile to help capture the coil spring.

BE CAREFUL when jacking. Only jack enough that the leaf touches the leaf-spring bracket pin. Any more and I could bend the leave spring.
Here's the trick to do this quickly. Get a spring compressor.
Barring a spring compressor being available, you COULD use the method below, but when you take off a finger or worse, just remember that I am NOT recommending it and that you would be stupid to do it this way. So don't do it. Like the Mythbusters say - don't try this at home!
Insert the top of the spring in the bumpstop perch. It's a tight fit and required that I screw it in, but that's how I wanted it.

I needed a 2-hook tie-down and a ratchet strap in good condition.
Use the tie-down to the leaf-spring bracket to hold the spring upright and keep it from bowing out when the ratchet strap is tightened.
I looped the ratchet strap 3 or 4 coils down from the top of the spring and around the front of the leaf spring. I checked for sharp edges, then starrted ratcheting it down, cranking on the tie down as needed to keep it coming down straight.

Just get it close. There's way too much pressure required to make it short enough to get under the bumpstop sides. Then I slowly popped it in place with a prybar. Notice my fingers are hardly even in the picture.
Once it's in, I DID NOT release the ratchet strap go. It will hurt.
Instead I slowly released the jack, checking the spring was going in. Then I put the jack under the axle and slowly jacked it up until the spring seated. Then I kept jacking until the straps started to loosen up. I took them off, dropped the axle to the right height and installed my new shock.
My old shocks would have worked, but longer shackles will make it drop too far. And it needs longer shackles. The current shackle sits at a light angle when it's on level ground, so it's not topped out sitting there, but it definitely needs shackles.
What's the height difference? Huge. I needed my HiLift to jack the truck up high enough to get the jack stands under the frame with the wheels off the ground. But I was able to use my floor jack under the rear pumpkin to get the truck off the jackstands.
On the passenger side, the truck sits completely level, measuring to the bottom body line (crease in the side panels)
On the driver's side, it's about 1" lower in the rear. I haven't had a chance to figure it out yet, but I'll probably get in there this afternoon and sort that out. The springs both say they're the same, that's the only thing I can think of. Especially since the fuel tank is on the passenger side (heavier).
I'm hoping it's not a spring problem. Both boxes indicate they're the same.
It also handles surprisingly well in the corners. It used to oversteer because the rear was too soft, right now it feels pretty balanced, even without a swaybar. I still need to align the tires more than by eye (it doesn't drift and the steering wheel is straight, so goodie for me!)
The front also still hits the tires at full droop, I'll probably look at that this evening. We have company coming and it's still hot out, nearly 100 today. While I grew up in S. AZ with hotter days, 100 is pretty hot out here and I'm not longer acclimatized.
Here it is after about 14 hours of work!! Look how nice it sits!

It flexes well. Yup, the driver's tire is in the air. :)

Front stretch

The driver's side took an hour to sort out as I wanted to be careful. The passenger side took about 25 minutes.
I was going to swap the rear brake line for a longer one, but it proved unnecessary AND I was running up against our deadline to get to the drag strip.
It's only 1/8 mile, but we got to watch some fast vehicles. Including this cool diesel which was chewing up and spitting out some street cars. High 90s and mid 7-seconds. Check out this video (sorry not inlined)
One of the things I wanted to change from the normal mod was to put something between the frame and the spring to manage any wear.
I ran out to a "local" steel place (is 32 miles away local?). They had some neat stuff, but one of the things I found was this base-plate. I cut the sides off so it would fit between the uprights of the bump stop.

Some of you will remember I used 14" 125# springs.

I started with the driver's side because it doesn't have all those scary brake lines, gas tank, etc. behind it. I figured do the easy side first.
Once I got the bumpstop cut off, I found I needed to trim the front upright a bit more, then bend them out with my very large Crescent wrench and my 3' cheater pipe. I bent them out so I could barely screw the spring in about 1/2-way. I wanted them to stay tight. They're a bit too tight, you can hear the springs sproinging (sliding in and out) when it stretches out and flexes. It turns out it's the coil below the bracket binding on the corner. I'll chamfer them.

The passenger side went MUCH faster. Be VERY careful around those brake lines with your Sawzall.
Here's how much I cut off the frame bump-stop thingy. Yes, it's a terrible picture (and backwards, compare to the pic above).
I removed the rear shock to allow the axle to drop as far as it can. Once I got it cut off, I inserted my bottle jack between the frame and the leaf. You can see my mondo-Crescent wrench. I still needed 3' of cheater pipe on it to bend the brackets without flame. Start in the middle so you give them a slight-round profile to help capture the coil spring.

BE CAREFUL when jacking. Only jack enough that the leaf touches the leaf-spring bracket pin. Any more and I could bend the leave spring.
Here's the trick to do this quickly. Get a spring compressor.
Barring a spring compressor being available, you COULD use the method below, but when you take off a finger or worse, just remember that I am NOT recommending it and that you would be stupid to do it this way. So don't do it. Like the Mythbusters say - don't try this at home!
Insert the top of the spring in the bumpstop perch. It's a tight fit and required that I screw it in, but that's how I wanted it.

I needed a 2-hook tie-down and a ratchet strap in good condition.
Use the tie-down to the leaf-spring bracket to hold the spring upright and keep it from bowing out when the ratchet strap is tightened.
I looped the ratchet strap 3 or 4 coils down from the top of the spring and around the front of the leaf spring. I checked for sharp edges, then starrted ratcheting it down, cranking on the tie down as needed to keep it coming down straight.

Just get it close. There's way too much pressure required to make it short enough to get under the bumpstop sides. Then I slowly popped it in place with a prybar. Notice my fingers are hardly even in the picture.
Once it's in, I DID NOT release the ratchet strap go. It will hurt.
Instead I slowly released the jack, checking the spring was going in. Then I put the jack under the axle and slowly jacked it up until the spring seated. Then I kept jacking until the straps started to loosen up. I took them off, dropped the axle to the right height and installed my new shock.
My old shocks would have worked, but longer shackles will make it drop too far. And it needs longer shackles. The current shackle sits at a light angle when it's on level ground, so it's not topped out sitting there, but it definitely needs shackles.
What's the height difference? Huge. I needed my HiLift to jack the truck up high enough to get the jack stands under the frame with the wheels off the ground. But I was able to use my floor jack under the rear pumpkin to get the truck off the jackstands.
On the passenger side, the truck sits completely level, measuring to the bottom body line (crease in the side panels)
On the driver's side, it's about 1" lower in the rear. I haven't had a chance to figure it out yet, but I'll probably get in there this afternoon and sort that out. The springs both say they're the same, that's the only thing I can think of. Especially since the fuel tank is on the passenger side (heavier).
I'm hoping it's not a spring problem. Both boxes indicate they're the same.
It also handles surprisingly well in the corners. It used to oversteer because the rear was too soft, right now it feels pretty balanced, even without a swaybar. I still need to align the tires more than by eye (it doesn't drift and the steering wheel is straight, so goodie for me!)
The front also still hits the tires at full droop, I'll probably look at that this evening. We have company coming and it's still hot out, nearly 100 today. While I grew up in S. AZ with hotter days, 100 is pretty hot out here and I'm not longer acclimatized.
Here it is after about 14 hours of work!! Look how nice it sits!

It flexes well. Yup, the driver's tire is in the air. :)
Front stretch
Plumbing and wiring the lockers, the compressor
During the workweek, Andrew and I were able to plumb the air lines, route them safely, and get the compressor installed and wired up.
This section will be a victim of the camera-phone that went missing. No pictures.
The air line was pretty straightforward. TIP: Route any lines on sprung axles with the brake line.
I'd decided to mount the compressor on the passenger fenderwell, so I routed the lines there, leaving plenty of slack so I could fine-tune the routing after the compressor was installed.
The hardest part is installing the dash switches. ARB does not include instructions or templates for the switch holes, which I found surprising. I cut some holes in cardboard until I had a hole for one switch. Then I had to google around on their site to find out that when you gang the switches up, you just cut out one hole big enough for the # of switches you need.
Armed with two templates, and after some careful measurement, I decided the axle switches would go next to the clutch-cancel switch cutout. I wanted to save the cutout for my future upgrade to a 5-speed and the factory switch.
The compressor switch would go between the rear deck switch and the dash dimmer switch.
A Dremel with a cutoff wheel set to 25% speed made quick work of the big cuts without too much melting. A utility knife with a sharp blade let me finish the job. I cut the hole slightly undersized and used the utility knife to sneak up on the right height and width of the hole. The switches are nice and snug.
BTW - install the switch faceplates LAST. After EVERYTHING is done and tested. I did and boy was I glad I did!
We routed the wires through the ECU grommet in the firewall, along with every other wire we've routed into the cab from the engine bay, then across the dash. There was even a few feet left.
The dimmer switch is pretty wide behind the dash and needed to be rotated 90 degrees. Since it's clocked by a pin that goes into a hole, we had to recreate the hole. Rather than pull the lower dash panel completely out, I heated up a small screwdriver and punched the hole, careful not to go all the way through.
After that, there was a plastic brace that needed trimming to allow the compressor switch the depth it needed.
It took a few hours, but it looks really good.
While I tried to locate the dimmer wire for the dash, the only one I could find was the ground, which worked in reverse (bright dash, low power, dim dash, high power). I was hoping to dim the switches with the dimmer. It turns out they're not too bright, which is really nice. I can't stand distractions at night like bright switches.
One thing I found was that there's some kind of interlock and I can't engage the front locker by itself. I have to turn on the compressor, the rear locker, then the front locker. I'm OK with that, so I'm not going to try to figure out how to bypass that yet. Worst case, in the boonies, I just swap solenoid leads on the compressor if I want to lock the front by itself for some reason.
By Thursday, we were ready for the weekend's work on lifting the rear and clearancing the arms for the wider tires.
This section will be a victim of the camera-phone that went missing. No pictures.
The air line was pretty straightforward. TIP: Route any lines on sprung axles with the brake line.
I'd decided to mount the compressor on the passenger fenderwell, so I routed the lines there, leaving plenty of slack so I could fine-tune the routing after the compressor was installed.
The hardest part is installing the dash switches. ARB does not include instructions or templates for the switch holes, which I found surprising. I cut some holes in cardboard until I had a hole for one switch. Then I had to google around on their site to find out that when you gang the switches up, you just cut out one hole big enough for the # of switches you need.
Armed with two templates, and after some careful measurement, I decided the axle switches would go next to the clutch-cancel switch cutout. I wanted to save the cutout for my future upgrade to a 5-speed and the factory switch.
The compressor switch would go between the rear deck switch and the dash dimmer switch.
A Dremel with a cutoff wheel set to 25% speed made quick work of the big cuts without too much melting. A utility knife with a sharp blade let me finish the job. I cut the hole slightly undersized and used the utility knife to sneak up on the right height and width of the hole. The switches are nice and snug.
BTW - install the switch faceplates LAST. After EVERYTHING is done and tested. I did and boy was I glad I did!
We routed the wires through the ECU grommet in the firewall, along with every other wire we've routed into the cab from the engine bay, then across the dash. There was even a few feet left.
The dimmer switch is pretty wide behind the dash and needed to be rotated 90 degrees. Since it's clocked by a pin that goes into a hole, we had to recreate the hole. Rather than pull the lower dash panel completely out, I heated up a small screwdriver and punched the hole, careful not to go all the way through.
After that, there was a plastic brace that needed trimming to allow the compressor switch the depth it needed.
It took a few hours, but it looks really good.
While I tried to locate the dimmer wire for the dash, the only one I could find was the ground, which worked in reverse (bright dash, low power, dim dash, high power). I was hoping to dim the switches with the dimmer. It turns out they're not too bright, which is really nice. I can't stand distractions at night like bright switches.
One thing I found was that there's some kind of interlock and I can't engage the front locker by itself. I have to turn on the compressor, the rear locker, then the front locker. I'm OK with that, so I'm not going to try to figure out how to bypass that yet. Worst case, in the boonies, I just swap solenoid leads on the compressor if I want to lock the front by itself for some reason.
By Thursday, we were ready for the weekend's work on lifting the rear and clearancing the arms for the wider tires.
Subscribe to:
Posts (Atom)