Tell Aluminess "Eric D with the 4Runner" sent you and they'll knock $50 off your bumper or shipping (any bumper they make, not just 4Runner bumpers).
I've long wanted an adventure-style front bumper, for every truck I've owned (my Blazer, the Cherokee, my wife's Yukon XL...). However, all the solutions out there I've looked at are steel, which is nice - but too heavy.
I first found Aluminess in
Toyota Owner where they built a front bumper for an FJ (great mag, you should get it!). Unfortunately, they didn't have a bumper for a 1st Gen 4Runner. Then I learned they were a meager 20 miles or so from my house!
Read on for the story of how a new bumper gets fabricated.
Day 1
I initially spoke with Kenny Gorham about the overall process. A new bumper style means fabrication, test fittings, adjustments, more test fittings, and, finally, installation! I'd have to give up a couple of afternoons, but then I'd have a smashing front bumper.
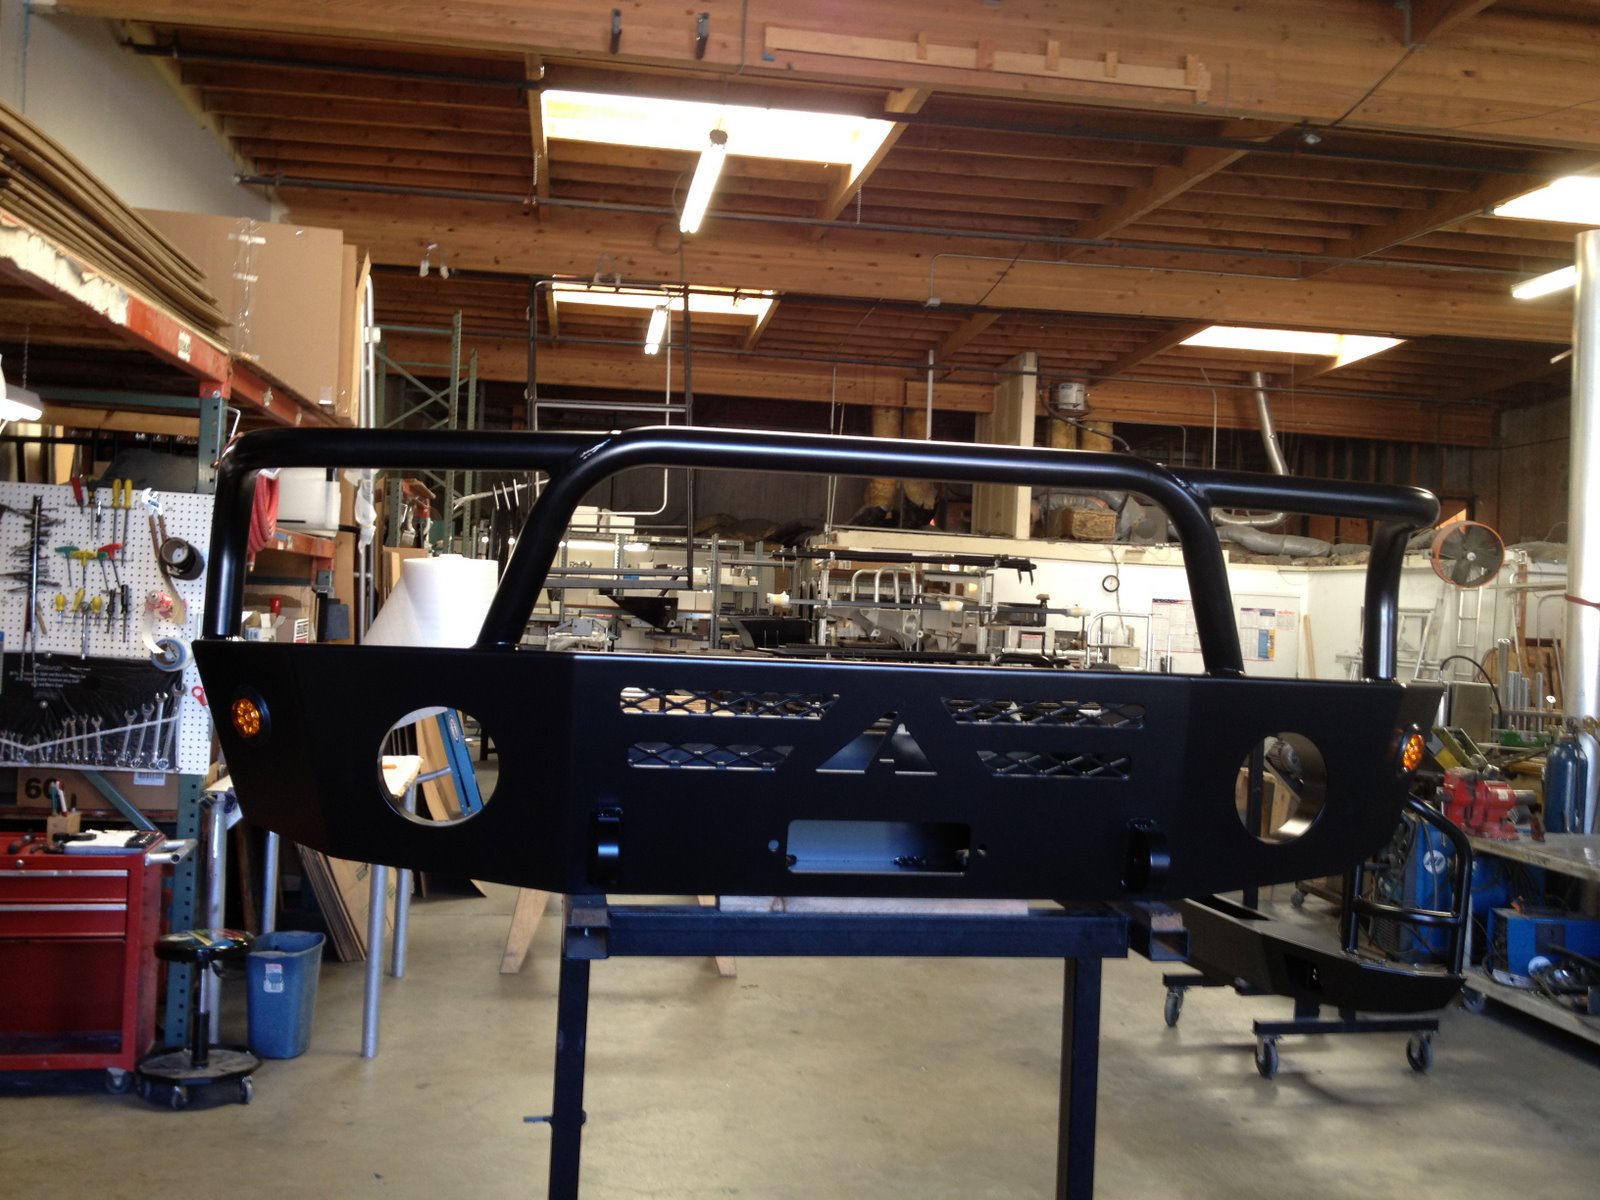
I showed up at 1PM for my appointment. On my tour through their shop, the first thing I was looking for was organization, then product weld and fit/finish quality. Their shop is well organized with all kinds of finished bumpers, roof racks, rear bumpers, and the parts that make them up stacked up waiting for welders. The welders have curtained-off areas behind making it easy enough to walk through the shop without incurring eye burns. The finished parts looked fantastic. I started feeling pretty good.

Then we got to a newly finished FJ bumper in bare aluminum. I missed a picture, but it was on its way powder coat. They asked if I wanted to pick it up. I did, and about fell over. There was NO WAY this bumper was that light. I easily one-handed it.
Next thing you know, I've pulled my truck into the shop and they've pulled my Smittybilt tube bumper and have started measuring, pulling out some stock pieces seeing how they'd fit, then asking me all kinds of questions about what I wanted, writing down the answers. I loved the process.
This took about 3-4 hours, which was fine by me. I'm blessed to have a job where I can work remotely and the Aluminess team let me crash in their conference rooms where I could plug in my laptop and take/initiate calls. They generously offered me their network, but I already have all the toys to work remotely. I'd take the occasional break and drift be to see what was up, answer a few questions, then back to work! Whaa-cha!
Kenny got measurements from Warn's site for this part of the process, but did ask that I bring my winch the following time.
We talked about what to do about the blinkers because the orange things next to the headlights are just side markers. You can see the factory blinkers attached to the SmittyBilt (the white things poking out the back), etc.
They bolted my bumper back up and sent me on my way, setting my expectation that this part would take a few weeks. I really wasn't in a rush, which I told him. I left at the end of the day feeling pretty good.
 Day 2
Day 2A few weeks later, as promised, I got a call from Kenny - "Hey Eric, when's a good time to come test fit the bumper? We'll need about 1/2 a day, and please bring your winch."
When I got to the shop, I saw this beauty laying on the ground. Right there and then I started thinking clear powercoat would look pretty cool.
Check out the attention to detail with the scallops to fit around the fenders. Man, I was pretty pleased.
I'd brought my winch as requested, separating it from the Warn hitch-mount cradle it had lived in the past 8 year. It's an original XD9000i (the slow one), but it's been a great winch. I'm ultra-careful with the cable, so there are very few broken strands and it's in great shape, even though it's pulled some serious loads.

One of the important questions was what to do with the brushguard. I really liked that I could just barely see the top edge of my Smittybilt over the hood, making it easy to know when I was going to ram into the parking garage wall or start pushing the car parked in front of me backwards. I also wanted it to be as strong as possible in case I did happen to catch a cow, horse, deer, or 4-wheeled critter out in the wild.

I wanted the bars closer to the outside of the bumper, but one of the engineers, correctly, pointed out that would cause night blindness as the headlight reflected off of it. Their attention to detail was awesome.
My next suggestion had him scratching his head. He wanted to be able to see the Toyota logo from the front. What if... I know beauty when I see it, but I'm not very good at describing what I think is good looking.
Pretty soon, we had a setup that met real-world needs, but looked good too. They mocked up a piece of tubing to show me what the center section might look like.
More measurements and mounting planning. .

The guys were great and I left that day knowing we'd end up with an awesome solution.
Day 3

A short time later, I get another call from Kenny. Time to spend another afternoon with him and his team!
When I showed up at the shop, this is what greeted me. How cool is this?! The brushguard looked even better than I had imagined.
It looks heavy, don't it? It ends up that it's very close to or lighter than the Smittybilt that came off the truck. How cool is that?
Getting it onto the truck was very quick, but they had some finish work to do on the mounting.
Not too much longer and here's what it looked like mounted. Hey! That's way too clean!
As you can see, that fairlead has earned its keep.

Here's are Before and After shots

I just happened to go to Costco when this guy was parked in the lot. Unfortunately, the car wash was closed by the time I made it here so my truck's still muddy.
Same year, same color, same stickers, same Smittybilt options! His was clean. Which truck would you rather have?!
Here's my truck in action at the JustRuns 12/3/11 Corral Canyon run.

If you look carefully, you can see just above the passenger side marker light (next to headlight), some mud is missing. That was a big branch that would have reshaped the hood, and possibly the light. The bumper is already earning it's keep.
O

Side view

 One of the things I like about the Aluminess bumper is that the winch area is fully enclosed and lockable. Or you can leave it unlocked.
 Inside the winch compartment is a lot more beef. Each side has 3 bolts holding the bumper on, and check out that clevis mount. The clevis has a straight pull to the mounting. Less twist on the frame or mounts. Check out those welds. I wish I could weld aluminum that pretty!


