Saturday, August 27, 2011

She runs like the wind again!

So it did in fact turn out to be a TPS.

When I searched for "22re surge" or "22rte surge" I didn't get hits with answers. So many of the page hits I was getting all talked about a funky idle, which I was not seeing.

So I changed by search to "22re surge -idle"
 Red herring.
I picked 22RE instead of 22RTE since I figured the turbo wasn't relevant. This part was correct.

Turns out "22re miss" or "22re hesitation" worked much better. I finally found a page which both seemed to describe my issue AND had an answer - TPS.

I used 4Crawler's excellent site to troubleshoot the issue:
  Toyota 2.4L/3.0L Throttle Position Sensor


Turns out this was the TPS. Measurements between IDL and E2 showed it had a problem, as did the ECU, throwing a code 7. And, because it's a turbo, it also blinked 14 times, which is very different than how it provides other codes (1 flash, pause, 4 flash is what I would have expected). Blinking 14 times is... Turbo overboost. Yep, I know all about that. >:)

Some quick comparisons of how it runs with the new TPS compared to what it's been doing for the past few weeks:
1. It's back to being as powerful as I expected
2. It goes up steep hills in OD again, doesn't need me to shift it down to 3rd.
3. The sproingy shifts into 3 and OD went away.
4. Gas MPG is... well, that verdict is out still. My last tank was 13.5, so I'm REALLY hoping to see 17 on this one. Or more is good!


Adjusting or Replacing the TPS

Carquest in town both stocked the part, and also had a great price.

It was 99 degrees out here today, but also quite humid. It doesn't help that I have a pin backing out of my ankle. I spent most of the day on the couch with my foot up. It's not unmanageable, but I do feel it. Surgery is Wednesday.

You get one guess which pin (aka screw) it is. :)


Since it's hot and I'm not into moving a lot at the moment anyways, I didn't get to working on it until after dark. This means no pictures.

I would have gotten to it sooner, but I had to run and get the part and close out a few honey-do's.

4Crawler's site above has some pics, but let me add some additional detail.

Last Christmas, the kids and wife got me a great LED headlight from Brookstone. I usually think they're overpriced on most of their stuff, but this headlamp has been awesome. It angles from straight ahead to 90 degrees down with positive detents, has a bright, low-beam, and SOS setting, and seems to run just about forever on 3 AAA batteries. I totally dig it. It sure beats sitting there with a AA (or D!) Mag Lite in your mouth! LOL


The TPS uses 2 philips screws to hold it on. There is no way you're going to get to the bottom one without some work. 4Crawler sells allen screws, in case you want to use a wobble allen to adjust it in the future. I don't expect to touch mine again until it goes bad.

To get to the bottom screw, you have to remove the throttle-body. It's pretty straightforward - 3 vacuum hoses, move the temperature sensor wire out of the way (remove it, don't forget to reinstall it!)


If you have a turbo using the stock metal pipe like I do (I don't have a CT20, instead my metal pipe was extended to fit the TEC turbo by welding in a new section), pull the intake-tube boot at the throttle body. I assume for normally aspirated trucks there's enough flex, but it most likely will be easier to just pull the intake boot too.

The trick with the boot on a turbo is to lubricate the metal pipe behind the boot, loosen the boot, and twist/slide it up the tube, rotate it about 180 degrees (throttle-body opening towards the front of the truck), then take it off.

Pull the accelerator cables (pedal, cruise) out of the throttle-cam.

There are 3 12mm bolts holding the throttle body on. The lower-left is a stud with a 12mm nut on it. Break all 4 loose and given them a little slack, then pull the 3 bolts out.

Remove the nut, and the 4th vacuum line under the TPS.

You can now loosen the two TPS screws if you're just doing an adjustment. Or, if you're replacing it, you're good to go.

Good luck!

Thursday, August 25, 2011

She starts hesitating and hitching/surging

At the very same time I installed the gears, the 4Runner started hesitating when accelerating. It was like I was pushing and fully releasing the gas pedal, but very quickly.

It was also running less well than before the gears. Now when a truck with 4.10s and 33s seems more powerful than after installing 4.88s...

There were other indicators something was wrong:
  1. The 4Runner would not go as fast down the highway as before the gears/lift. I expect this to some degree since there's a lot more air being pushed with the lift. But the truck feels like it's driving into a headwind as speeds go up, and 75-80 is harder than it should be. This thing ripped with 225/75R15s and 4.10s, which calculate out to the same as 33s and 4.88s - something's up.
  2. Further proof the 4.88s/33s are nearly the same as 225/15s - the speedo was accurate with the 225/4.10 combo, way low with 4.10/33s, and is now about 2mph high at 70 with 4.88s/33s. If anything, I now have a slight advantage.
  3. It doesn't go up hills any faster or more easily than with the 4.10s
  4. I could go up some hills at about 60 in Drive with 4.10s. The nearly 20% jump from 4.10s to 4.88s should mean I can run the same hill in OD (20% steeper than D). No way right now.
At first the hesitation was was only present when it was cold, first thing in the morning. But it gradually  started to do it when it was warm as well.

Since it's easy, I decided to check for codes. The word is that, even if the Check Engine light is not on, you may have codes.

I'd never checked codes on this truck, so it was a learning process. Here's a couple tidbits I learned. :)

22RE's generate codes as Flash, flash, flash...pause...flash...pause,pause,pause...repeats (or next code).
It turns out 22RTE's generate some additional codes. A 14 is 14 flashes, not Flash...pause...flash,flash,flash,flash... it threw me for a second when it got past 9, then kept going... LOL

A quick check of the ECU codes showed two in memory.
  • 14 - Turbo overpressure (hit the fuel cut - and it had with the old cam after the dyno shop finished adjusting it)
  • 7 - TPS no bueno
I'll doublecheck it with an ohmeter tomorrow since they're not cheap.

Here's LC Engineering's thorough setup/verify/adjust procedure - you CANNOT just remove the old one and install the new one.

I'm checking on the right place to get a TPS now. I prefer OE parts, but they're sooo much more expensive. Time to ask my hookup at the local dealer if he can really hook me up! :)

I'll be surprised if it fixes the power issue, but we'll see.

I think it's amazing that these issues started at the same time I added gears. LOL

I'll report back on the outcome!

Monday, August 15, 2011

Before and after picture montage

So... was all that work worth it?

When I bought it


After new tires


After the lift


Wheel stuffing
Before


After (doesn't stuff up as far)


How's the overall articulation? Remember the Before has the swaybar connected, the After does not.
Before


After


I think this shot tells a lot about what's going on with the suspension at the front and back.
The front goes up just as much - all the way to the bumpstops. One of the benefits of a long-travel kit.
The rear drops just as far as it did before - it's being limited by the shackle length. I need to extend the rear shackle to take full advantage of the rear lift.

Before


After


Front flex
Before (swaybar is installed)


After (no swaybar, long travel kit)


Rear flex
Before


After (stretches even more!)


The rear moves up in the world, joins the front and we're done!

I have to say the front of the truck was looking pretty good. I was eager to see what the rear would look like with a 'Zuk rear coil mod.


The driver's side took an hour to sort out as I wanted to be careful. The passenger side took about 25 minutes.

I was going to swap the rear brake line for a longer one, but it proved unnecessary AND I was running up against our deadline to get to the drag strip.

It's only 1/8 mile, but we got to watch some fast vehicles. Including this cool diesel which was chewing up and spitting out some street cars. High 90s and mid 7-seconds. Check out this video (sorry not inlined)

One of the things I wanted to change from the normal mod was to put something between the frame and the spring to manage any wear.

I ran out to a "local" steel place (is 32 miles away local?). They had some neat stuff, but one of the things I found was this base-plate. I cut the sides off so it would fit between the uprights of the bump stop.


Some of you will remember I used 14" 125# springs.


I started with the driver's side because it doesn't have all those scary brake lines, gas tank, etc. behind it. I figured do the easy side first.

Once I got the bumpstop cut off, I found I needed to trim the front upright a bit more, then bend them out with my very large Crescent wrench and my 3' cheater pipe. I bent them out so I could barely screw the spring in about 1/2-way. I wanted them to stay tight. They're a bit too tight, you can hear the springs sproinging (sliding in and out) when it stretches out and flexes. It turns out it's the coil below the bracket binding on the corner. I'll chamfer them.


The passenger side went MUCH faster. Be VERY careful around those brake lines with your Sawzall.
Here's how much I cut off the frame bump-stop thingy. Yes, it's a terrible picture (and backwards, compare to the pic above).


I removed the rear shock to allow the axle to drop as far as it can. Once I got it cut off, I inserted my bottle jack between the frame and the leaf. You can see my mondo-Crescent wrench. I still needed 3' of cheater pipe on it to bend the brackets without flame. Start in the middle so you give them a slight-round profile to help capture the coil spring.


BE CAREFUL when jacking. Only jack enough that the leaf touches the leaf-spring bracket pin. Any more and I could bend the leave spring.

Here's the trick to do this quickly. Get a spring compressor.

Barring a spring compressor being available, you COULD use the method below, but when you take off a finger or worse, just remember that I am NOT recommending it and that you would be stupid to do it this way. So don't do it. Like the Mythbusters say - don't try this at home!

Insert the top of the spring in the bumpstop perch. It's a tight fit and required that I screw it in, but that's how I wanted it.


I needed a 2-hook tie-down and a ratchet strap in good condition.
Use the tie-down to the leaf-spring bracket to hold the spring upright and keep it from bowing out when the ratchet strap is tightened.
I looped the ratchet strap 3 or 4 coils down from the top of the spring and around the front of the leaf spring. I checked for sharp edges, then starrted ratcheting it down, cranking on the tie down as needed to keep it coming down straight.


Just get it close. There's way too much pressure required to make it short enough to get under the bumpstop sides. Then I slowly popped it in place with a prybar. Notice my fingers are hardly even in the picture.

Once it's in, I DID NOT release the ratchet strap go. It will hurt.
Instead I slowly released the jack, checking the spring was going in. Then I put the jack under the axle and slowly jacked it up until the spring seated. Then I kept jacking until the straps started to loosen up. I took them off, dropped the axle to the right height and installed my new shock.

My old shocks would have worked, but longer shackles will make it drop too far. And it needs longer shackles. The current shackle sits at a light angle when it's on level ground, so it's not topped out sitting there, but it definitely needs shackles.

What's the height difference? Huge. I needed my HiLift to jack the truck up high enough to get the jack stands under the frame with the wheels off the ground. But I was able to use my floor jack under the rear pumpkin to get the truck off the jackstands.

On the passenger side, the truck sits completely level, measuring to the bottom body line (crease in the side panels)

On the driver's side, it's about 1" lower in the rear. I haven't had a chance to figure it out yet, but I'll probably get in there this afternoon and sort that out. The springs both say they're the same, that's the only thing I can think of. Especially since the fuel tank is on the passenger side (heavier).

I'm hoping it's not a spring problem. Both boxes indicate they're the same.

It also handles surprisingly well in the corners. It used to oversteer because the rear was too soft, right now it feels pretty balanced, even without a swaybar. I still need to align the tires more than by eye (it doesn't drift and the steering wheel is straight, so goodie for me!)

The front also still hits the tires at full droop, I'll probably look at that this evening. We have company coming and it's still hot out, nearly 100 today. While I grew up in S. AZ with hotter days, 100 is pretty hot out here and I'm not longer acclimatized.

Here it is after about 14 hours of work!! Look how nice it sits!


It flexes well. Yup, the driver's tire is in the air. :)


Front stretch


Plumbing and wiring the lockers, the compressor

During the workweek, Andrew and I were able to plumb the air lines, route them safely, and get the compressor installed and wired up.

This section will be a victim of the camera-phone that went missing. No pictures.

The air line was pretty straightforward. TIP: Route any lines on sprung axles with the brake line.

I'd decided to mount the compressor on the passenger fenderwell, so I routed the lines there, leaving plenty of slack so I could fine-tune the routing after the compressor was installed.

The hardest part is installing the dash switches. ARB does not include instructions or templates for the switch holes, which I found surprising. I cut some holes in cardboard until I had a hole for one switch. Then I had to google around on their site to find out that when you gang the switches up, you just cut out one hole big enough for the # of switches you need.

Armed with two templates, and after some careful measurement, I decided the axle switches would go next to the clutch-cancel switch cutout. I wanted to save the cutout for my future upgrade to a 5-speed and the factory switch.

The compressor switch would go between the rear deck switch and the dash dimmer switch.

A Dremel with a cutoff wheel set to 25% speed made quick work of the big cuts without too much melting. A utility knife with a sharp blade let me finish the job. I cut the hole slightly undersized and used the utility knife to sneak up on the right height and width of the hole. The switches are nice and snug.

BTW - install the switch faceplates LAST. After EVERYTHING is done and tested. I did and boy was I glad I did!

We routed the wires through the ECU grommet in the firewall, along with every other wire we've routed into the cab from the engine bay, then across the dash. There was even a few feet left.

The dimmer switch is pretty wide behind the dash and needed to be rotated 90 degrees. Since it's clocked by a pin that goes into a hole, we had to recreate the hole. Rather than pull the lower dash panel completely out, I heated up a small screwdriver and punched the hole, careful not to go all the way through.

After that, there was a plastic brace that needed trimming to allow the compressor switch the depth it needed.

It took a few hours, but it looks really good.

While I tried to locate the dimmer wire for the dash, the only one I could find was the ground, which worked in reverse (bright dash, low power, dim dash, high power). I was hoping to dim the switches with the dimmer. It turns out they're not too bright, which is really nice. I can't stand distractions at night like bright switches.

One thing I found was that there's some kind of interlock and I can't engage the front locker by itself. I have to turn on the compressor, the rear locker, then the front locker. I'm OK with that, so I'm not going to try to figure out how to bypass that yet. Worst case, in the boonies, I just swap solenoid leads on the compressor if I want to lock the front by itself for some reason.

By Thursday, we were ready for the weekend's work on lifting the rear and clearancing the arms for the wider tires.

Sunday morning - time to do the front of the truck...


This morning, here's what's left to pull off
- swaybar
- brake lines
- axle shafts (gotta pull the c-clip in the hubs)
- 2 bolts holding the 3rd member in

Oh, and putting all this stuff back on.

We're watching monster trucks on TV while we wait for it to get late enough the air tools and radio won't aggravate the neighbors. 20 more minutes.

Before I go anywhere with the truck, I need the airlines attached to make sure we keep crap out of the air line bulkhead fittings. Our earlier drive used a zip tie and a nitrile glove, but I'm not good with that as a solution for much further than the first break-in run.


All right, the Blazeland portion, and the front gears/ARB are installed as of today. More details later, but I am totally shagged. I am no longer the young pup I once was. Good thing my son helped so much. He did a LOT on truck, really helping make it come together.

With 285/75R16s on stock Toyota steelies, the Blazeland hit at full stretch. A lot. And get much worse when turned. It wouldn't take more than a few feet to carve a big gash in the sidewall.

I took a grinding wheel to the edge of the upper control arm, making it flush with the uprights that go to the lower plate on the upper control arm. Pics later. The edge of the plate is now flush with the washers of the outermost plate bolts (gold), and matches the angle to the 2 upright pieces of plate going down to the lower plate.

That keeps it from hitting the tire at full droop with them pointed straight ahead. Barely. Like maybe by 1/8"

Any turning, tho, and I won't have a sidewall as the tire gets forced into the corners of the plate (front or rear). It only takes a few degrees.

I'm really prefer not to do spacers and I'm not considering a wider offset wheel for a couple of reasons. I'd need like 2" more offset, and that's quite a bit.

Sitting on the ground at the ride height I've chosen, there's plenty of clearance. I'll be taking a look at it next weekend to see what other options I might have.

There's no way to make the stock swaybar work, so I'll have to look into other options.

No driving until it gets align, which I'll probably do after I get the rear up. Lifting the rear is my priority, I can always just put some limiting straps on it to keep the tire sidewall from getting carved.

The used torsion bars I bought had the adjusters locked on. In the background are the used Blazeland arms.


I could wiggle them, but could not hammer them off with a dead-blow or with a sledge. And since I don't have a press...
I drilled out the backs (there's a pinhole there to let air in which provided the guide)
The wet shorts, btw, is sweat and water I poured over my head. It was very hot when I did this and, now that I'm 41 with a long term desk job, I sweat very easily.


While I don't have a press, I do have gear pullers. Which is what I needed the hole for.


And the torsion bar came free! That's sand. Lots and lots of sand. The PO had not left the rubber caps on the torsion bar, and they packed up. Needless to say, I reused the caps from the old torsion bars!


Pulling the control arms and front diff in the driveway in the heat was a lot of work considering there may not be more than 30 bolts which need to be pulled.


This is what most of the front diff oil on the ground looks like. The front diff fell off the jack and flipped the oil pan upside down. It did not speed up the operation.


A little Dawn and a whole lot of scrubbing with a push broom when I was done and you can't even tell oil was spilled there. Whew!!

As I mentioned, my phone went missing with a lot of pictures. Take my word for it, it went back together that day. It was a long day, but well worth it.

When it was done, we had both sets of gears swapped out, the front lifted and new balljoints installed, but with a clearance problem at full droop with the wide tires, and the rear drooping since it was at its stock, sagged height.

That was the end of Sunday.

Time to put the lift on!

The last parts I was waiting for arrived!


During the build, between weekends, my phone went missing, along with a whole lot of pictures. I'd uploaded a few to Facebook and G+, so I'll be able to reuse those here.


After all the research, I decided a Blazeland long travel kit coupled with a 'Zuk rear coil mod to the rear would provide the best bang for the buck while still meeting my design goals. I'll eventually replace the rear with leafs, and may replace the fronts with Total Chaos uniball units when I go to high-end shocks, but for the near term, this setup should let me learn more about what I do and don't like while I keep upgrading the other parts of the truck.


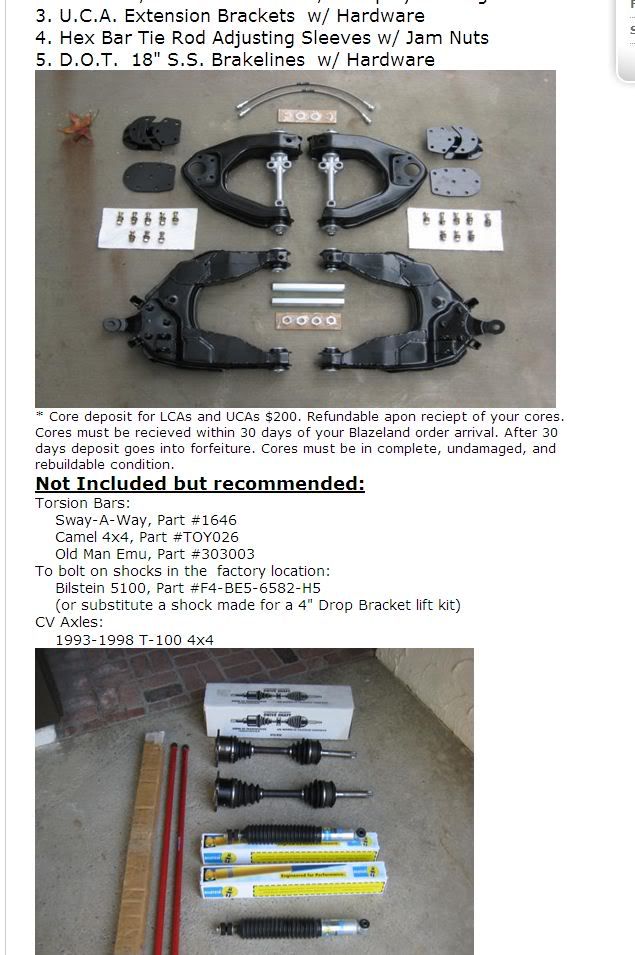
Here's what the Blazeland kit comes with. Used, I had less to start with, so needed a few more parts.

Front setup

  • I bought the Blazeland control arms and tie-rod extensions used from an inmate. It turned out they were the original style and the newer ones are set up to allow clearance for wider tires. More later.
  • I found the torsion bars used on Craigslist.
  • Balljoints were new Moog units. 
  • Axleshafts were reman units from CarQuest. I was time-constrained or I would have bought the new ones, but they were about a week out. I'll buy one new one and carry it as a spare.
  • Brake lines were part of a Trail Gear lift package of brake lines - 1 rear, 2 fronts

Rear setup

  • 14" x 125# Black Magic springs
  • Rear brake line
  • 2 fence base plates from a local metal fab shop to use as upper spring mounts
At the same time, I was installing new 4.88s and ARBs to match the 33" tall TreadWrights (285/75R16). A lot of the parts came from Davez Offroad Performance. They're a small shop so their turnaround isn't overnight, but they come recommended. Additionally, his pricing was strong right out of the gate. I hate having someone throw me near MSRP, then drop their price when I tell them I've been shopping around. Just give me a fair price from the get-go.

I was feeling under the weather the Saturday I started, so I didn't get started until about 1PM with anything. SWMBO's truck needed an oil change, and I needed to mess with the pool filter. But no way I was going another weekend without at least getting the gears installed. And how much more work would a couple of control arms be, anyways?

My 11yo son, Andrew, was ready to help. He's constantly tinkering with his bicycles, moving things from one to the other, so he's always a help.

We started by fixing one of the jack stands. Its ratchet-mech shield had broken off the last time we used it. I broke out the welder, and Andrew welded the left side of the shield after I showed him how to weld the right side. It's amazing how the paint on that orange thing flamed up.  :)

Since the rear diff was the easiest, we started with that. 

Andrew jacked up the truck, put it on jackstands, and pulled off the rear tires while I drained the rear pumpkin and pulled the driveshaft. 

The truck ate the last set of front pads I'd put on it. This usually means the rear brakes aren't doing much.

When I got the rear drums off, I found the shoes had a lot of material, but the material had a lot of heat cracking. Which was a surprise since the drums looked great and didn't have any heat marks at all, or any scoring. Cheap shoes was my best guess. I'm going to put rear discs on here as soon as I get the $$ for a full-float kit (so I can flat-tow it), but I'm a big fan of good-working brakes, so that wasn't going to do.

One surprise when removing the axles was that I had to disconnect the rear brake lines since the backing plate is sandwiched between the bearing and the flange. I'm used to Ford 9" semifloats where you go through the axle flange to remove the nuts and the backing plate is separate from the axle assembly. 

For 223K miles, the gears in the rear 3rd looked great. The fluid came out in decent condition with very little metal on the drain plug. The original owner took great care of this truck. I checked the splines on the axle shafts, and they were straight and in great shape. Awesome.

The new carrier is a V6 carrier. My truck is a turbo and the 3rd casing has the same extra ribbing found on the V6 carrier. Given my build goals, having beef is part of the plan. Extra $$, but worth the peace of mind. 

It was a snug fit getting the new carrier into the housing. I went slowly and easily as the last thing I wanted to do was damage the copper air line for the ARB. With some gentle persuasion and careful twisting, it snicked into place. 

Air tools are a godsend when you're faced with that many nuts and bolts, and it was quickly secured. We pushed the axles back in, secured the backing plates, and attached the brake lines. 

Next up was to attach the driveshaft. Err, the flange bolt pattern is bigger than my driveshaft's. Well, that's not good. 

I considered swapping flanges, but really didn't want to mess with the staked pinion nut (I hate reusing those and prefer a new one), and then I figured I'd have to make sure I had the preload right, and then, and then...

While tinkering with it, I realized the driveshaft self-centers in the flange. Ooohhh... This'll be easy!

I found that I did not have the 25/64th (9.9 mm) drill bit I needed. And I needed rear brake shoes anyways. 

Since SWMBO and the girls were out shopping/working with the oldest's car, we rolled the rear tires into the garage, tossed the tools in there too, and headed for town in SWMBO's truck. Since it's nice, we cleaned up. A bit. Sorta. 

True Value had a nice and expensive drill bit.
Carquest had some cheap shoes that I liked.
I already had plenty of brake fluid and brake cleaner
We were missing something... Ah, lunch! We didn't have lunch!

By now it was about 4 and Andrew had been doing a great job so I decided to treat him, so off we went.

When we got back, we both crawled under. While I worked on the flange, Andrew filled the rear diff.

I decided to offset the new holes 45 degrees from the existing holes in the flange, so I marked the first hole and drilled it. The driveshaft seated nice and snug in the center hole of the flange, enough I'd have to work it out. 

Even so, I ran a bolt into the first hole, marked the second hole (the one directly across from the bolt), spun the shaft back over to the bolt, and pulled the bolt. Just as I set the bolt and air-ratchet on the ground, "CLONG!" went the driveshaft as it came loose from the flange and dropped on my right eyebrow. Oww. I squirmed for a few seconds, then started cracking up. Andrew generously didn't start laughing until he was able to determine which way I was going with it. At nearly midnight, I had a nice goose-egg. 


I would not be making this mistake again... LOL And, sure enough, the driveshaft would not longer sit in the flange by itself. Three more holes and the rear driveshaft was on. Sweet!

Next, we swapped on the new brake shoes. Andrew has only experienced disc brakes, so this was his first set of drum brakes. He had to put his back into it to get the spring retainers off the locating pins. 

I'd forgotten how intricate Toy rear drums were with the horseshoe clip for the eBrake lever, and the way they route their springs makes it so my brake spring tools don't work. Good thing I have a great set of pliers for that with tiny teeth that don't hurt the springs.

When we moved to the driver's side, we found the backing plate adjustment hole plug was missing, which had allowed more sand than desired into that side. That sand found its way in there from our trip through Pinyon Canyon on a rainy day, where we splashed through miles of wet sand wash. I wish I had better pics, that trip was AWESOME. I'm totally doing that again next wet season. This time, no strap will be required... for us!

Next up was bleeding the brakes. 

I was surprised, and a bit shocked, to find the master cylinder nearly empty. I'd seen the right rear dripping the whole time into the oil pan, but I really expected that the master cylinder would be separated between front and rear. I'll need to check to see what happens when one end leaks. All my Chevy's have seperate master cylinder wells so if one end leaks, the other end is unaffected.

Once the brakes were bled until the fluid ran clear, it was time to throw on the rear tires, drop it, and go. 

"go" included cleaning up the tools and putting them back in the garage for a bit. Most of the meta shavings were on a couple of paper towels I'd put down, making it easy to toss them in the garbage.

With 4.88s and 285/75R16s (33s), the GPS told us the speedo was once again accurate. A nice side-effect was that OD was once again useful at speeds under 80mph. 

No whines. No vibrations. No grinding feelings. No leaks. Success!!

To add a little icing, the brakes actually worked well again!

We racked up about 40 gentle miles, then ran back home as the sun was setting and the colors were dulling. 

The next step was to clean up the remaining metal shavings. Out came the shop vac since a broom is not always effective with those little metal bits. As it was, I ended up with one in my heel (I often work barefoot). It came out at the end of the evening with a very minor assist from a needle.

Since it was going to be best hold the truck up by the frame, out came the big jackstands. I have a pair of these I use every once in a blue moon. I hate to store them in between, but have zero complaints when I need them.

Andrew jacked it up again and we set the stands on the frame. Andrew took off the front wheels while I laid out all the parts to make sure nothing was missing.

Hmmm... that was a lot of parts.

First up was relaxing the torsion bars. Passenger side, break the jam nut loose, add some impact wrench (Shhhh! No, you're not supposed to!), and brrrrrrr-ziiiiiii, it was off.

The driver's side has the cat running by it. It was still a mite warm, but not super-hot by now. The cat on this thing cools off pretty well. The muffler stays hot however. The shop who'd rebuilt the motor had, for some reason I'm still not sure of, removed the muffler heat shield when doing the 2.5" exhaust, causing the rear driver's seat to melt.  Keep those shields up, Scotty!

The cat was still hot enough that if I kept my hand on it for more than a couple of seconds, it was time to take it off. And the jam nut on this side was ON. Wrench here, wrench there, puulllll! Nothing. To top it off, the edge of the heat shield for the cat is right where your hand will go when it breaks loose, probably opening it up. 

To make things worse, it was now dark and still a bit warm under the truck, I was sweating so much my head-light wouldn't stay on my head. Andrew held the LED mini-mag on the nut while I worked on the problem. That's a pretty bright little torch.

The only way to tell the jam nut from the holding nut was the faint line between them as their flat edges were perfectly aligned. I could turn the bolt by hand and hold both nuts with a wrench against the frame, but that was sooo hard on the bolt I really didn't want to go the 2"+ that way. Plus I hadn't had my Wheaties, so it was going to wear me out. If this was my last resort, I would definitely not use the impact gun on it. That sucker puts out more than 600 ft/lbs at max setting, I wouldn't notice something was going wrong until it was way wrong. 

Finally, I got smart and put a wrench on the bottom nut, braced it to the frame, and TIGHTENED the bolt with the air hammer (set to 2 of 5, which is about 80-90 ft/lbs). After a brief fight, the jam nut stayed where it was while the bottom nut moved away from it. Move the wrench to the jam nut, and the bolt was in my hands seconds later. Hoorah! Man, that took a while.

I used to be a lot faster, but nowadays I sit behind a desk and hold down a chair for hours on end. 

For giggles, we found a yellow crayon and marked the control arm shims. Off came the bottom control arm bolts, the top control arm bolts, the steering arm adjusters, the front shocks, driveshaft (since the swaybar acts as a d-shaft hoop, no worries about getting clonked on the head!).

Around then we called it a night, put the tools and parts in the garage, closed up, and took a shower, cleaning up the thick grease off our arms and legs (shorts, of course!). By now it was about 10pm.