Friday, June 7, 2013

Getting the rear rear window to go up with tailgate switch.

If you've been following this blog, you may remember my 4runner's rear window would originally not go up or down when I bought it. I redid the connections at the relay and got it to work with the interior switch, and now the rear gate key will bring the window down, but I can't get it to go up with the key.

I used to have an '88 Blazer and never had any rear glass issues, so I'm surprised with the number of issues first gen 4Runners have with their rear glass. At the end of the day, it's all pretty straightforward - once you know everything about them! :)

Since the truck has been relatively unmolested, I assumed something had gone bad. Err, no. In the process of diagnosing this, I started with the relay since it had had issues before, and also replaced the tailgate switch. The troubleshooting process for those two issues is linked at the end of this article.

PROBLEM description
The switched Blue/Black-stripe thin wire to the tailgate has power at the relay, but not at the tailgate switch, checked where it exits the body and enters the tailgate, and again at the tailgate switch. If I ground it at the relay, the window goes up (trips the relay, and ta-da!). 

Things I learnededed [sic]
Anywhere I say "ground ... wire X" below, I mean I used a test lamp and it kicked the relay. 
Example: I "grounded" the blue/black thin wire (tailgate switch wire) at the relay, causing the rear window to go down, ignoring interlocks - I was able to extend the window with the gate open. I only extended it a couple inches since breaking it is not high on my list of to-do's. Using the switches, interlocks work as intended. 

Some wire color notes for my '87 SR5, colors at the master window relay, and before the center-console interior switch pigtail (chassis-side). 

Any of the thin wires below grounded with a test light will actuate the rear window.

Rear window down:
- Blue/White stripe : wire to tailgate, 12v at the relay 
-- Thin one actuates relay, goes from relay to tailgate switch. 12v at the relay, 12v at the tailgate switch. 
-- Thick one powers motor only, 12v at relay when relay is tripped
- Green/Yellow : center console switch. 12v at the relay at all times

Rear window up: 
- Blue/Black stripe : wires to tailgate. 
-- Thin one actuates relay/ goes from relay to tailgate switch. 12v at the relay. I suspect it's supposed to have 12v at the tailgate switch.
-- Thick one powers motor. 12v at all times
- Red/Yellow : center console switch. 12v at the relay at all times

Let's get on with it, then!
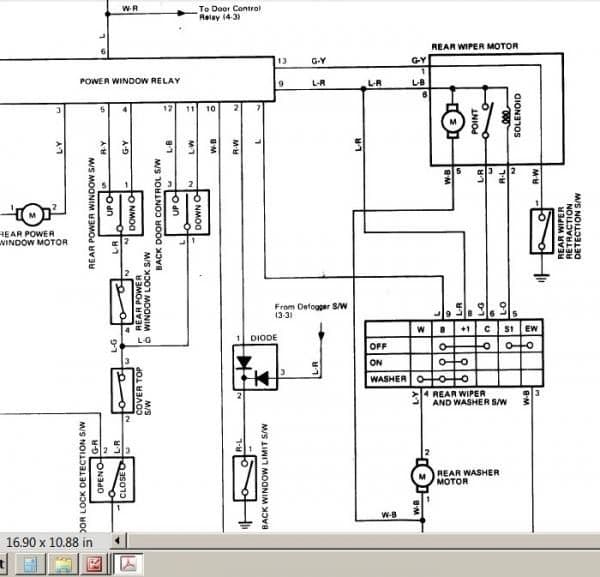
Here's the wiring diagram, colors match (L-B is Blue/Black)


Turns out there's a connector inside the jack compartment - which I'd completely forgotten existed. I'd thought I'd have to pull the whole side panel to get at the harness. Boy, was that a nice surprise!

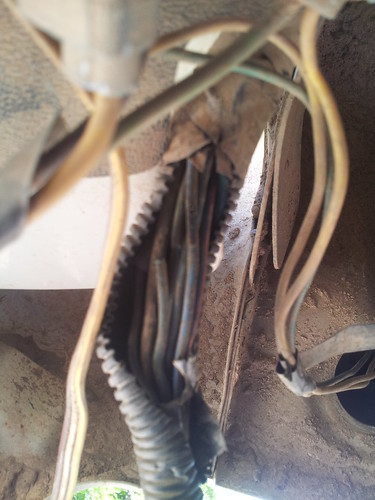
Once inside the jack compartment, I found someone's method of testing wires involved slicing the insulation off. Or more. Here's the harness on the truck side, where they were looking for the wires to the tail-light. You know, the ones that exit the harness just below that and go to the tail light...


Following that harness straight down is a connector to the tailgate harness. Power on both sides for our little Blue/Black wire. Aha... Suddenly the fat part of the harness under the truck made sense.


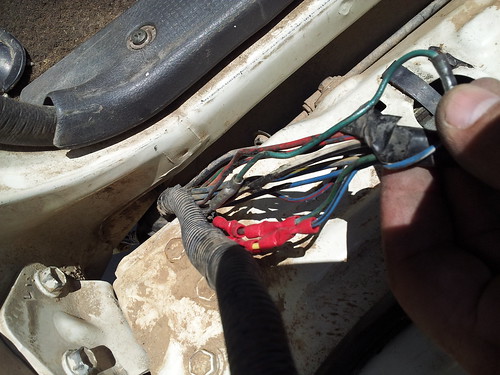
I was able to pull the harness out of the body and work on the broken parts above the tailgate (See the hole where the "aftermarket" trailer wiring exits - there's a rubber plug for that hole - I'd pulled it out while working on this, and the connector is dangling below the truck. Don't leave it like that, the quarter will fill with rocks and mud).

In the bright SoCal sunlight, with the wires cleaned up, this was the extent of the damage. Look at those slices in the insulation (and the above pic shows the green wire completely cut through). I'm holding the Blue/Black wire - corrosion had damaged the 2 remaining wire strands.

After some splicing. I needed to use multiple butt connectors or completely replace the wires.
I used liquid electrical "tape" on the wires which retained their integrity but had their insulation sliced open.

After this pic, I also used the liquid tape to seal the butt connectors as this part of the loom hangs under the truck and gets a lot of mud thrown at it and will be under water from time to time using past experience to guide me.

My son, Andrew, was helping me as he always does.  He found this floating around in the tailgate. Good thing, I can see it cracking the glass during some high speed offroading. I've been in there 3 times and never saw it.


A bit later, a friend of his came over, so they played some version of HORSE. That Aluminess bumper sure is handy. And only like 60#, ridiculously light for a winch bumper. Let them know I sent you when you call over there, it's worth $50 off to you. They used my 4Runner for the firstgen Toyota template. Great shop, great guys. :)


It feels really good to have the window working from the tailgate switch.

Here's the YotaTech thread solving this, there is more detail and more pics.

Thursday, June 6, 2013

Catalytic Converter: followup; no warranty love...

With the catalytic converter removed, the truck is running FANTASTICALLY. There's still some congestion in the exhaust, which I'll get checked out, but right now the vac/boost gauge is doing exactly what it's supposed to. But it's boosting up to 7psi consistently, and pulls pretty hard for a 4-banger. Finally.

Not unexpectedly, the catalytic converter mfgr declined to warranty the converter, and the shop which installed it (also did my motor, look back through the posts for some serious whinging on my part) has not jumped forward to help me out and insulate me from their vendor - which they no longer use since they didn't come through on warranties very often. However, it's definitely a manufacturer's issue, so I'll be raising this one to the right associations to get some satisfaction.

I'll be taking the 4Runner down to Ed Hansen's to get the muffler checked for catalytic converter matrix detritus, and a Magnaflow cat (or whatever they recommend). They did a fantastic job on my motorhome - it's never run this good or gotten 8mpg before (amazing what we celebrate, eh!? Beats 6.5-7mpg tho!).

Next up - getting the rear window to go up using the rear tailgate switch.

And a teaser for upcoming posts... >:-)

Monday, May 27, 2013

Catalytic converter making ringing noises... that's not good!


What happened to shops doing quality work, selling quality parts? A lot of the early posts reflected my
frustration with the shops I've been using. A lesson learned is to no longer trust Yelp reviews since they're up for sale: http://www.buyyelpreview.com/

And just so you don't think I'm a "Negative Nelly" about others touching my cars, here are some shops which have done exceptional work for me and my friends. I HIGHLY recommend every one of them.

San Diego/Ramona, CA
http://www.edhansonsmuffler.com/ (exhaust work. My motorhome runs fantastic now, and sounds GREAT) They're getting my 4Runner this time.
http://davesautoramona.com/ (general auto repair)
http://www.sdbmwmc.com/catalog/ (motorcycle)

Portland, OR
http://www.yelp.com/biz/line-up-shops-portland (alignment. They ROCK.)
http://www.bmwportland.com/index.htm (fantastic experience and prices for my BMW car services)

Green Valley/Tucson, AZ
http://www.greenvalleychamber.com/members_detail.asp?ID=94 (general services) I learned the art of working on cars here and providing customers value for dollar paid. Rocky is the best. If he can't do it well, he won't. He's also an ex Alfa/Porsche/Mercedes/etc. mechanic.
http://www.yellowpages.com/green-valley-az/mip/green-valley-radiator-ac-5843046?lid=5843046 (Radiator and AC)
The engine rebuilder I used there has changed hands, so I can't vouch for their current products, but holy cow did that place build me some great motors at some awesome prices.

When the engine was installed, I had a 2.5" exhaust setup installed. This replaced everything from the turbo downpipe (came as 2.5") back to the exhaust tip, including catalytic converter and muffler.

In retrospect, a lot of the problems I've had now make total sense. Let's start at the beginning.

Several months after having the exhaust/engine done, the truck started having boost problems. It would intermittently boost a max of 2psi. The dyno shop I'd gone to had told me the wastegate actuator on the turbo was messed up and very finicky, so I assumed that was it. Over time, the level of boost dropped even further.

What was weird is that it would do that from time to time, other times it worked great - but never over 5psi. I completely unhooked it, which should have had it boosting high pressures.... 5psi.  Except when it boosted 2psi or less. Meh.

A friend who's good at this stuff (he's designed and built controllers for Banks and others) told me it had to be a constriction in the exhaust.

I took the truck into the shop and asked them to check. They used one of their little cameras and gave me a picture of the internals of a cat that was fine! (it's around here somewhere, you'll see why soon). Around that time, I'd noticed the back seat had MELTED from the heat of the muffler. The shop had, for reasons unknown, removed the muffler heat shield (the bolt areas were shiny and clean). Even so, that shouldn't have melted the seat. They put the heat shield back on and had an upholsterer patch the seat. Geez, Louise - it's so critical to have a GOOD shop work on your stuff.

Unfortunately, I didn't apply any logic to it at the time...

The truck's intermittently run well and poorly, turning in 13.5mpg average pretty regularly, which is miserable for one of these. Guys I wheel with are getting 19mpg on 35s. For a very short bit, it turned in 19mpg, but that didn't last. For some reason, as soon as I lifted the truck and installed bigger tires, gears, power went out the window and mpg settled into 13.5 mpg. I was confused, but my personal life and work was my top priority and I shelved this.

Fast forward months where work was running me 100 hours a week for months on end, and the 4Runner sat and sat and sat....

I finally got a weekend and headed out with one of my clubs to go on a light 4x4 trip. Had a great time, but all of a sudden, the boost dropped to 2psi on the way home. When I stopped in front of my house, admittedly a little firmly as I was kinda chapped, I heard a single "tong!" from under the truck. When I tapped the cat, it made rattling noises. The flex joint in front of the cat was ballooned out. And the cat only had a flange on the front.

Suddenly everything came together for me.

A) The muffler should not have gotten hot enough melt the seat. From the factory, the cat for 2000 Cherokees didn't have a heat shield. They worked great until you towed, then the could set fire to the carpet.  More than a few Cherokees have burned to the ground because of this. My 2000 Cherokee started the carpet smoking climbing Grapevine with a 4000 pound load on a trailer, which is how I learned of this.

B) The catalytic converter had fallen apart, sending catalytic chunks into the muffler, where they did their job, getting hot enough to cook the seat.

C) There was a big chunk in the cat which was blocking the outlet, causing the 2psi boost issue and ballooning the flex joint.

D) The pic the shop had given me was only of the front of the cat. They were probably thinking of running lean, melting the cat, but since the truck is running overly rich, there's no way it would have melty damage.

E) The first thing I did after lifting and locking the truck was go climb things. Vertical things where all I could see was sky out of the windshield. The big chunk would have rolled to the back and ended up getting wedged in the pipe, creating the performance problem.

Check out these pics when the cat got cut off

Here's the front, the side with the only flange. Looks good.


Here's the back of the cat - the side without a flange, and which was not inspected when I brought it in the last time. 2 of the 3 bulkheads are broken.


Moral of the story - have them check BOTH sides of the cat if you think the cat's at fault. AND make sure the muffler gets replaced. After I posted this on FB, a friend pointed out that the Nissan Titans had a similar issue. Even worse, they would suck up some of the grit from the cat and cause engine damage. With a turbo, I'm a little less concerned about that, but inside, I'm expecting to start using oil at a prodigious rate any minute...

I'm waiting for the warranty cat (5 more days), and none too thrilled to  have the same brand cat. I may get a Magnaflow installed and take the replacement for this one and eBay or Craigslist it. 

In the meantime, there's a test pipe in place and I can say that the truck runs awesome. Boost now climbs and falls easily, and it hits 7psi every time. It runs MUCH better too. I was able to do 75 with at least a 30mph headwind on Saturday, with pedal left. That felt soooo good.

It feels awesome to be making progress.

Even so, that "boost controller" the dyno shop sold me? Doesn't work. I spent 20 minutes toying with it and have now just ordered a real one online.

I'm getting really excited again!


Time to fix the AC!

When  I bought the truck, the AC worked great, which I thought was awesome. When I got it back from the shop, the AC still worked. But weeks later, it died, quickly. That indicated a massive leak, not something simple. Rather than take it back to the shop and not know if it was done right, I decided to fix it myself. I'd done AC one time before with a friend who did things like that for a living, so I had a hands-on overview. And, I have to say, YouTube sure helps make it easier.

It took very little time to find that the condensor had a hole in it from a bolt in the grille. Someone leaned against it and it worked its way in over time. The solid motor mounts didn't help, I'm sure.

AC parts have come down tremendously and I was able to order a replacement condenser. At the same time, I decided to convert it to R134A since R12 has become so hard to get and I want to be able to self-service the system in the future.

Skeptically, I used the Harbor Freight compressor-driven vacuum pump and their AC manifold. It leverages the venturi effect to create a vacuum. It worked quickly and pulled a pretty decent vacuum, I must say.
 

Since I didn't take pics, I'll leave the installation part to some google searches. :) However, I feel it is very important to call out a very neat feature Toyota included in their AC setup - the ability to easily change the RPM at which the compressor kicks on.

After doing the install and conversion, the AC worked GREAT - underway. At stoplights, the compressor kicked off and the dash was quickly pumping outside air into the cab, bringing in heat and any humidity. Yech!

Behind the glovebox (snap down the vinyl), there's a little black or green (mine) box with a knurled aluminum knob poking out the top. Wish I had a picture for you. Warm the truck up fully and put it in Drive if it's an automatic (have someone standing on the brake so you don't get run over) or idle in Neutral if not, turn the headlights and any other power-hungry electrics on so the system is fully loaded, and turn the knob (can't remember the direction, was months ago) until the compressor kicks on. Then about 1/8 turn more just to be safe. NOTE: This assumes the idle VSV is working as expected.

R134 is inherently less efficient than R12, so long periods of idling will mean the AC isn't quite as cold, but once underway, it's quite good. It gets expensive trying to improve this, so you'll have to chalk it up to Treading Lightly on the environment resulting in reduced AC performance. While you could turn the idle up, there are lots of reasons that's not a good solution.

Another issue was that the AC would intermittently stop working. Nothing I'd changed would cause this. We were in Houston after a hurricane in 95+ degree super-humid heat when we found out this tidbit. Man oh man, was that uncomfortable!!

While adjusting the AC amplifier, I found a connector had hooked itself onto the glovebox light switch bracket and was intermittently shorting out. That must have been it, as it's been months and the AC works as expected. Thank goodness, I wasn't looking forward to trying to change some of the sensors under the dash!!