So I was on quite a roll this evening. I got my blower motor working, I got my AC problem narrowed down. I need a couple parts for the turbo, so while I'm waiting, I decided to tackle the radio.
I had gotten quite a windfall of parts in September of '09 from someone who was parting out his truck for Cash4Clunkers. His was real nice, I felt bad. But I feel good about the parts I saved from the wreckers. :) What's amazing about this blog is the timeline. I can't believe how long I've had this truck and how little I've done. It really speaks volumes for where my priorities have been.
One of the things I got was his radio out of his truck. I liked it because it was decent, but not desireable. Since the top comes off the truck, the last thing I want is people breaking the dash up to steal stuff.
The one that was in my truck is a 1998 Pioneer, just like the one I put in my '81 Honda Prelude around then. The front was grimy from the PO (see the link above for the condition of the carpet). The left speaker worked intermittently, and the crackling wasn't pleasant. It's a good deck, this one had just seen far better days. It MAY get transplanted to our Rhino if not tossed outright. The deck in there got caught in a sandstorm and quit working.
When I got the truck, the radio was in its hole, cockeyed. As part of making up all hte issues, the shop that rebuilt my motor had "fixed" my deck. It definitely was straight, and it definitely looked better.
So you can imagine my surprise when I pulled the deck out and found the wires were an outright mess. Some taped, some with wire nuts, some just twisted together. Not the worst wiring job I've seen, but a definite runner-up. The plug for the deck had a screw rammed into it, why, I don't know since the clip works fine.
Happily, they didn't butcher the factory harness, instead using an adapter, allowing me to unplug the absolute mess and plug in the new deck and harness. Click/snap, done!!
While I was in there, I found one more fuse and relay behind the radio at the transmission tunnel/firewall junction (wondering if it's for the rear heater). Toyota put fuses everywhere in their trucks, man!
While I was under the dash, I noticed the RCA cable was routed over the brake pedal rod (no, really) and came down near the gas pedal. I rerouted it over the AC ducting, getting another 5", making it easier to put the deck back in. The cable no longer goes to anything, it looks like a PO swapped out a lot of the nice stuff in there before selling it.
A quick 20 minutes and I had a new-to-me deck installed and ready to go. Even better, both speakers are working and sound fine. The deck is about 7 years old, but it works well and sounds nice. And it's not fancy enough someone will want to steal it.
It doesn't put out nearly as many watts as the Pioneer (about 1/2), I'll see how it sounds next time I drive it. Here's hoping it's OK. If not, another candidate for the Rhino and the sand gods!
Monday, July 11, 2011
AC is intermittent...
My AC has been intermittent since I got the truck. It works, it doesn't work. It's been annoying, especially when it's truly hot and humid out, like when we were in Houston (it played toad behind the motorhome after disconnecting the rear driveshaft).
Not long after the new engine, I had the AC converted to R134a.
Lately, the AC hasn't worked at all. I used to be able to get it to come on about every 2nd-10th try. Guessing that a borderline part had finally given up the ghost, and with the heat of summer coming, especially when you get out to the desert surrounding San Diego, it was time to fix it!
I tell you, troubleshooting issues is so much easier with forums and with Google than it used to be. I searched around and learned some things it could be.
A quick note for anyone troubleshooting electrical problems. You need both a meter AND a test light.
Meters are awesome. I spent about an hour one day troubleshooting my sister's 1981 Celica and why the headlighs wouldn't work when they had 12v running to them (13.6 actually). Scratching my head. Taking more readings. Scratching my head some more. Finally I broke out my test light and tested a headlight connector. The problem was immediately noticeable as it barely lit up. Following the wires back to the connector at the battery showed a wire that had corroded nearly all the way through in a hard-to-spot way, 2 meager strands providing the 12v it took to fool my meter into thinking all was well.
The FSM (Factory Service Manual) is a must for anyone working on this stuff. This one is a 1988 version instead of 1987, but usually that's close enough! The wiring diagrams in books like these are great, but what's missing is... where is that silly relay/connector/fuse block/switch/etc. actually located on the truck! I have a Haynes to go with the FSM.
So... back to the AC.
In my case, the AC button lights up, but nothing happens. The fact it lights up at all was a little weird I thought, but it turns out it seems to just mean the button is pushed in.
Since getting the switch out looked to be a pain, and it lights up 100% of the time it's depressed, I figured I would start with the AC relay. Hopefully it was easier to get to and I could check for current from the switch with my handy-dandy test light.
The AC relay is directly behind the glovebox, on top of the evaporator housing, just to the right of centerline (unlike the left a forum post had indicated - that's the AC Amplifier). The glovebox was easy to get behind, pulling down the flap (gently!) and popping the box itself down past the left and right catches (gently again!). When I flipped the switch on and off, the relay clicked merrily. Hmm.... That's good, but not for me. :)
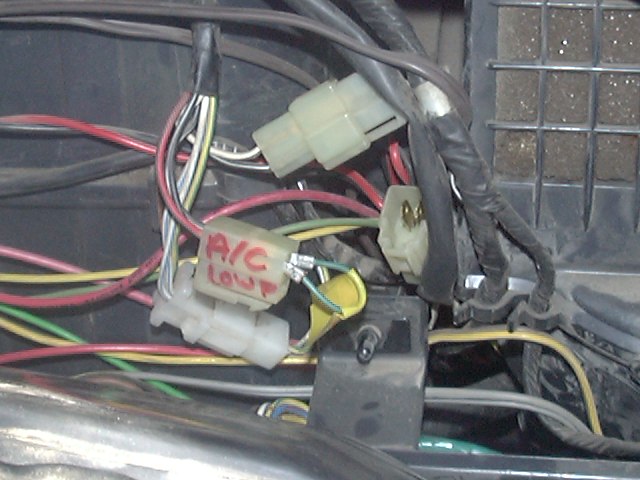
I borrowed this picture from 4Crawler
The little black button is the light switch for the glovebox.
He's marked the AC low pressure switch connector.
The connector below it is for the thermistor.
My thermistor connector was jammed behind the glovebox switch, wearing through the white/blue wire's insulation and causing a short. Since no fuse was damaged, and looking at the wiring diagram, it appears to be on the ground-side. However, it could certainly explain the intermittency since it runs back into the AC Amplifier at that point. The AC Amp controls compressor lockup.
I taped the wire up, then moved the connector up higher and used some of the wire clips available to keep it there.
Unfortunately, that did not change the behaviour - the compressor still wasn't coming on.
Well, the low pressure switch is right there, let's check it. Hmmm, power to only one side (red wire, incoming).
I pulled a cap off the compressor and just touched the schrader valve. Nothing. Held it down. Nothing.
The system is totally empty (standard pressure). Crap, time to find the leak... It's been converted to R134, so it'll be easy to rectify once I've sorted out the leak. When it was converted, it held vaccum and worked for over a year, so this is a new problem.
Hopefully it's not the compressor (cha-ching!!).
It wasn't a total loss, I got to tear into the truck a bit and learn more about it.
At the same time, I found the heater and AC fuses behind the dash. No, really. Not hard to get to, but you have to pull the glovebox out (2 minutes) to get to them.
Not long after the new engine, I had the AC converted to R134a.
Lately, the AC hasn't worked at all. I used to be able to get it to come on about every 2nd-10th try. Guessing that a borderline part had finally given up the ghost, and with the heat of summer coming, especially when you get out to the desert surrounding San Diego, it was time to fix it!
I tell you, troubleshooting issues is so much easier with forums and with Google than it used to be. I searched around and learned some things it could be.
A quick note for anyone troubleshooting electrical problems. You need both a meter AND a test light.
Meters are awesome. I spent about an hour one day troubleshooting my sister's 1981 Celica and why the headlighs wouldn't work when they had 12v running to them (13.6 actually). Scratching my head. Taking more readings. Scratching my head some more. Finally I broke out my test light and tested a headlight connector. The problem was immediately noticeable as it barely lit up. Following the wires back to the connector at the battery showed a wire that had corroded nearly all the way through in a hard-to-spot way, 2 meager strands providing the 12v it took to fool my meter into thinking all was well.
The FSM (Factory Service Manual) is a must for anyone working on this stuff. This one is a 1988 version instead of 1987, but usually that's close enough! The wiring diagrams in books like these are great, but what's missing is... where is that silly relay/connector/fuse block/switch/etc. actually located on the truck! I have a Haynes to go with the FSM.
So... back to the AC.
In my case, the AC button lights up, but nothing happens. The fact it lights up at all was a little weird I thought, but it turns out it seems to just mean the button is pushed in.
Since getting the switch out looked to be a pain, and it lights up 100% of the time it's depressed, I figured I would start with the AC relay. Hopefully it was easier to get to and I could check for current from the switch with my handy-dandy test light.
The AC relay is directly behind the glovebox, on top of the evaporator housing, just to the right of centerline (unlike the left a forum post had indicated - that's the AC Amplifier). The glovebox was easy to get behind, pulling down the flap (gently!) and popping the box itself down past the left and right catches (gently again!). When I flipped the switch on and off, the relay clicked merrily. Hmm.... That's good, but not for me. :)
I borrowed this picture from 4Crawler
The little black button is the light switch for the glovebox.
He's marked the AC low pressure switch connector.
The connector below it is for the thermistor.
My thermistor connector was jammed behind the glovebox switch, wearing through the white/blue wire's insulation and causing a short. Since no fuse was damaged, and looking at the wiring diagram, it appears to be on the ground-side. However, it could certainly explain the intermittency since it runs back into the AC Amplifier at that point. The AC Amp controls compressor lockup.
I taped the wire up, then moved the connector up higher and used some of the wire clips available to keep it there.
Unfortunately, that did not change the behaviour - the compressor still wasn't coming on.
Well, the low pressure switch is right there, let's check it. Hmmm, power to only one side (red wire, incoming).
I pulled a cap off the compressor and just touched the schrader valve. Nothing. Held it down. Nothing.
The system is totally empty (standard pressure). Crap, time to find the leak... It's been converted to R134, so it'll be easy to rectify once I've sorted out the leak. When it was converted, it held vaccum and worked for over a year, so this is a new problem.
Hopefully it's not the compressor (cha-ching!!).
It wasn't a total loss, I got to tear into the truck a bit and learn more about it.
At the same time, I found the heater and AC fuses behind the dash. No, really. Not hard to get to, but you have to pull the glovebox out (2 minutes) to get to them.
The blower only blows on the last 2 positions.
Ever since I bought my 4Runner, the blower only worked on positions 3 and 4. 1 & 2 were nonfunctional. Like everyone, I assumed it was going to be the switch. The thought of tearing into the dash wasn't exciting me, so I kept putting it off.
It turns out it's an easy fix for the 4Runner. Toyota wanted around $30 for the part, local parts store as cheap as $10.xx. I went with that option. Plus they're local!
4Crawler's site has provided a wealth of information. May it never go offline. Here's the hot tip on replacing the blower resistor.
It's tucked up in front of the blower motor, getting the screw back into it was a bit of a chore. I had the old one in my hand in about 2 minutes. It took me about 10 to work the screw back in and make sure the resistor was properly seated.
Ahhh, now my blower blows on 1 and 2!
The turbo goes loose... again.
Well, the lift and lockers are on hold as the truck is not driveable. Oh, sure, if the monsters were chasing me or a monster earthquake happened, but an exhaust leak has the opportunity to screw up some of my hoses and wiring, so it's going to stay parked.
My turbo has gone loose again. You can tell it's coming loose because it start squalling in a "I need a bearing!" kind of way. That's really just air leaking by the exhaust manifold/turbo junction, as it got looser on the ride home, it quit squalling and the sound of a massive exhaust leak took over. Boost plummeted to 3 bars on the gauge.
Last night I dug into it a bit. For a newly rebuilt motor and turbo, this thing sure has a lot of oil leaks. :(
The turbo lost one stud, the other 3 range between loose and very loose. The exhaust pipe to turbo has a nut that would have come off if it had the room to do so. The exhaust manifold had a stud underneath that might have been hanging on by a thread at most.
I have a feeling I'll be retightening just about every bolt that shop touched (intake side was already done by another shop - scan down for that saga). Since the machine shop, which has a solid reputation, did the bottom end, I'm not worried about a connecting rod coming loose. And I retorqued the head bolts when I put in a new cam, so I know those are good.
Since my phone is not grease-proof, I may not get a lot of pictures.
The upside is that I'll be happy with how well it runs when I'm done!
The upside is that I'll be happy with how well it runs when I'm done!
Subscribe to:
Posts (Atom)