During the build, between weekends, my phone went missing, along with a whole lot of pictures. I'd uploaded a few to Facebook and G+, so I'll be able to reuse those here.
After all the research, I decided a Blazeland long travel kit coupled with a 'Zuk rear coil mod to the rear would provide the best bang for the buck while still meeting my design goals. I'll eventually replace the rear with leafs, and may replace the fronts with Total Chaos uniball units when I go to high-end shocks, but for the near term, this setup should let me learn more about what I do and don't like while I keep upgrading the other parts of the truck.
Here's what the Blazeland kit comes with. Used, I had less to start with, so needed a few more parts.
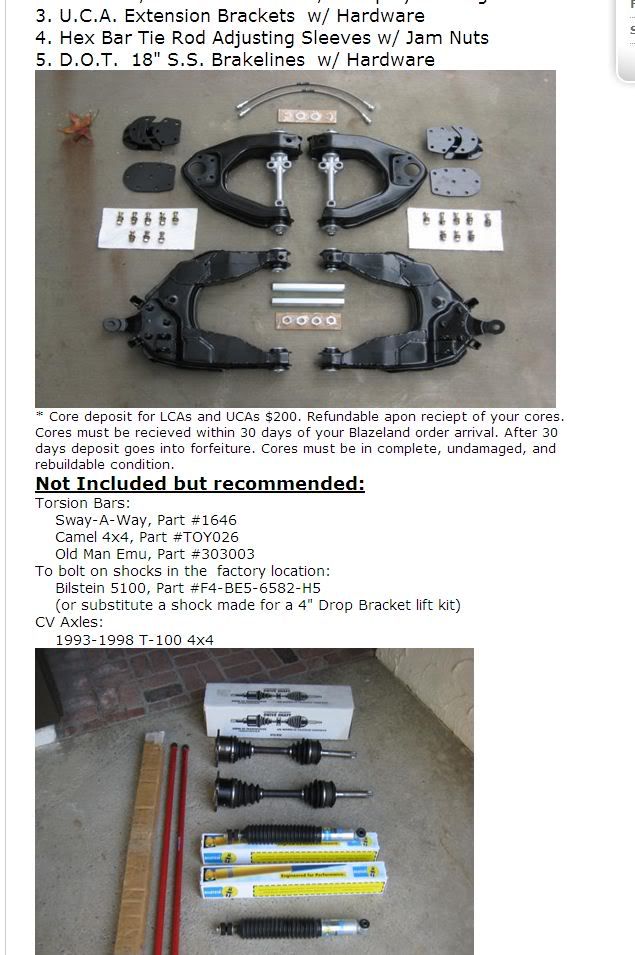
- I bought the Blazeland control arms and tie-rod extensions used from an inmate. It turned out they were the original style and the newer ones are set up to allow clearance for wider tires. More later.
- I found the torsion bars used on Craigslist.
- Balljoints were new Moog units.
- Axleshafts were reman units from CarQuest. I was time-constrained or I would have bought the new ones, but they were about a week out. I'll buy one new one and carry it as a spare.
- Brake lines were part of a Trail Gear lift package of brake lines - 1 rear, 2 fronts
Rear setup
- 14" x 125# Black Magic springs
- Rear brake line
- 2 fence base plates from a local metal fab shop to use as upper spring mounts
At the same time, I was installing new 4.88s and ARBs to match the 33" tall TreadWrights (285/75R16). A lot of the parts came from Davez Offroad Performance. They're a small shop so their turnaround isn't overnight, but they come recommended. Additionally, his pricing was strong right out of the gate. I hate having someone throw me near MSRP, then drop their price when I tell them I've been shopping around. Just give me a fair price from the get-go.
I was feeling under the weather the Saturday I started, so I didn't get started until about 1PM with anything. SWMBO's truck needed an oil change, and I needed to mess with the pool filter. But no way I was going another weekend without at least getting the gears installed. And how much more work would a couple of control arms be, anyways?
My 11yo son, Andrew, was ready to help. He's constantly tinkering with his bicycles, moving things from one to the other, so he's always a help.
We started by fixing one of the jack stands. Its ratchet-mech shield had broken off the last time we used it. I broke out the welder, and Andrew welded the left side of the shield after I showed him how to weld the right side. It's amazing how the paint on that orange thing flamed up. :)
Since the rear diff was the easiest, we started with that.
Andrew jacked up the truck, put it on jackstands, and pulled off the rear tires while I drained the rear pumpkin and pulled the driveshaft.
The truck ate the last set of front pads I'd put on it. This usually means the rear brakes aren't doing much.
When I got the rear drums off, I found the shoes had a lot of material, but the material had a lot of heat cracking. Which was a surprise since the drums looked great and didn't have any heat marks at all, or any scoring. Cheap shoes was my best guess. I'm going to put rear discs on here as soon as I get the $$ for a full-float kit (so I can flat-tow it), but I'm a big fan of good-working brakes, so that wasn't going to do.
One surprise when removing the axles was that I had to disconnect the rear brake lines since the backing plate is sandwiched between the bearing and the flange. I'm used to Ford 9" semifloats where you go through the axle flange to remove the nuts and the backing plate is separate from the axle assembly.
For 223K miles, the gears in the rear 3rd looked great. The fluid came out in decent condition with very little metal on the drain plug. The original owner took great care of this truck. I checked the splines on the axle shafts, and they were straight and in great shape. Awesome.
The new carrier is a V6 carrier. My truck is a turbo and the 3rd casing has the same extra ribbing found on the V6 carrier. Given my build goals, having beef is part of the plan. Extra $$, but worth the peace of mind.
It was a snug fit getting the new carrier into the housing. I went slowly and easily as the last thing I wanted to do was damage the copper air line for the ARB. With some gentle persuasion and careful twisting, it snicked into place.
Air tools are a godsend when you're faced with that many nuts and bolts, and it was quickly secured. We pushed the axles back in, secured the backing plates, and attached the brake lines.
Next up was to attach the driveshaft. Err, the flange bolt pattern is bigger than my driveshaft's. Well, that's not good.
I considered swapping flanges, but really didn't want to mess with the staked pinion nut (I hate reusing those and prefer a new one), and then I figured I'd have to make sure I had the preload right, and then, and then...
While tinkering with it, I realized the driveshaft self-centers in the flange. Ooohhh... This'll be easy!
I found that I did not have the 25/64th (9.9 mm) drill bit I needed. And I needed rear brake shoes anyways.
Since SWMBO and the girls were out shopping/working with the oldest's car, we rolled the rear tires into the garage, tossed the tools in there too, and headed for town in SWMBO's truck. Since it's nice, we cleaned up. A bit. Sorta.
True Value had a nice and expensive drill bit.
Carquest had some cheap shoes that I liked.
I already had plenty of brake fluid and brake cleaner
We were missing something... Ah, lunch! We didn't have lunch!
By now it was about 4 and Andrew had been doing a great job so I decided to treat him, so off we went.
When we got back, we both crawled under. While I worked on the flange, Andrew filled the rear diff.
I decided to offset the new holes 45 degrees from the existing holes in the flange, so I marked the first hole and drilled it. The driveshaft seated nice and snug in the center hole of the flange, enough I'd have to work it out.
Even so, I ran a bolt into the first hole, marked the second hole (the one directly across from the bolt), spun the shaft back over to the bolt, and pulled the bolt. Just as I set the bolt and air-ratchet on the ground, "CLONG!" went the driveshaft as it came loose from the flange and dropped on my right eyebrow. Oww. I squirmed for a few seconds, then started cracking up. Andrew generously didn't start laughing until he was able to determine which way I was going with it. At nearly midnight, I had a nice goose-egg.

I would not be making this mistake again... LOL And, sure enough, the driveshaft would not longer sit in the flange by itself. Three more holes and the rear driveshaft was on. Sweet!
Next, we swapped on the new brake shoes. Andrew has only experienced disc brakes, so this was his first set of drum brakes. He had to put his back into it to get the spring retainers off the locating pins.
I'd forgotten how intricate Toy rear drums were with the horseshoe clip for the eBrake lever, and the way they route their springs makes it so my brake spring tools don't work. Good thing I have a great set of pliers for that with tiny teeth that don't hurt the springs.
When we moved to the driver's side, we found the backing plate adjustment hole plug was missing, which had allowed more sand than desired into that side. That sand found its way in there from our trip through Pinyon Canyon on a rainy day, where we splashed through miles of wet sand wash. I wish I had better pics, that trip was AWESOME. I'm totally doing that again next wet season. This time, no strap will be required... for us!
Next up was bleeding the brakes.
I was surprised, and a bit shocked, to find the master cylinder nearly empty. I'd seen the right rear dripping the whole time into the oil pan, but I really expected that the master cylinder would be separated between front and rear. I'll need to check to see what happens when one end leaks. All my Chevy's have seperate master cylinder wells so if one end leaks, the other end is unaffected.
Once the brakes were bled until the fluid ran clear, it was time to throw on the rear tires, drop it, and go.
"go" included cleaning up the tools and putting them back in the garage for a bit. Most of the meta shavings were on a couple of paper towels I'd put down, making it easy to toss them in the garbage.
With 4.88s and 285/75R16s (33s), the GPS told us the speedo was once again accurate. A nice side-effect was that OD was once again useful at speeds under 80mph.
No whines. No vibrations. No grinding feelings. No leaks. Success!!
To add a little icing, the brakes actually worked well again!
We racked up about 40 gentle miles, then ran back home as the sun was setting and the colors were dulling.
The next step was to clean up the remaining metal shavings. Out came the shop vac since a broom is not always effective with those little metal bits. As it was, I ended up with one in my heel (I often work barefoot). It came out at the end of the evening with a very minor assist from a needle.
Since it was going to be best hold the truck up by the frame, out came the big jackstands. I have a pair of these I use every once in a blue moon. I hate to store them in between, but have zero complaints when I need them.
Andrew jacked it up again and we set the stands on the frame. Andrew took off the front wheels while I laid out all the parts to make sure nothing was missing.
Hmmm... that was a lot of parts.
First up was relaxing the torsion bars. Passenger side, break the jam nut loose, add some impact wrench (Shhhh! No, you're not supposed to!), and brrrrrrr-ziiiiiii, it was off.
The driver's side has the cat running by it. It was still a mite warm, but not super-hot by now. The cat on this thing cools off pretty well. The muffler stays hot however. The shop who'd rebuilt the motor had, for some reason I'm still not sure of, removed the muffler heat shield when doing the 2.5" exhaust, causing the rear driver's seat to melt. Keep those shields up, Scotty!
The cat was still hot enough that if I kept my hand on it for more than a couple of seconds, it was time to take it off. And the jam nut on this side was ON. Wrench here, wrench there, puulllll! Nothing. To top it off, the edge of the heat shield for the cat is right where your hand will go when it breaks loose, probably opening it up.
To make things worse, it was now dark and still a bit warm under the truck, I was sweating so much my head-light wouldn't stay on my head. Andrew held the LED mini-mag on the nut while I worked on the problem. That's a pretty bright little torch.
The only way to tell the jam nut from the holding nut was the faint line between them as their flat edges were perfectly aligned. I could turn the bolt by hand and hold both nuts with a wrench against the frame, but that was sooo hard on the bolt I really didn't want to go the 2"+ that way. Plus I hadn't had my Wheaties, so it was going to wear me out. If this was my last resort, I would definitely not use the impact gun on it. That sucker puts out more than 600 ft/lbs at max setting, I wouldn't notice something was going wrong until it was way wrong.
Finally, I got smart and put a wrench on the bottom nut, braced it to the frame, and TIGHTENED the bolt with the air hammer (set to 2 of 5, which is about 80-90 ft/lbs). After a brief fight, the jam nut stayed where it was while the bottom nut moved away from it. Move the wrench to the jam nut, and the bolt was in my hands seconds later. Hoorah! Man, that took a while.
I used to be a lot faster, but nowadays I sit behind a desk and hold down a chair for hours on end.
For giggles, we found a yellow crayon and marked the control arm shims. Off came the bottom control arm bolts, the top control arm bolts, the steering arm adjusters, the front shocks, driveshaft (since the swaybar acts as a d-shaft hoop, no worries about getting clonked on the head!).
Around then we called it a night, put the tools and parts in the garage, closed up, and took a shower, cleaning up the thick grease off our arms and legs (shorts, of course!). By now it was about 10pm.
No comments:
Post a Comment