During the workweek, Andrew and I were able to plumb the air lines, route them safely, and get the compressor installed and wired up.
This section will be a victim of the camera-phone that went missing. No pictures.
The air line was pretty straightforward. TIP: Route any lines on sprung axles with the brake line.
I'd decided to mount the compressor on the passenger fenderwell, so I routed the lines there, leaving plenty of slack so I could fine-tune the routing after the compressor was installed.
The hardest part is installing the dash switches. ARB does not include instructions or templates for the switch holes, which I found surprising. I cut some holes in cardboard until I had a hole for one switch. Then I had to google around on their site to find out that when you gang the switches up, you just cut out one hole big enough for the # of switches you need.
Armed with two templates, and after some careful measurement, I decided the axle switches would go next to the clutch-cancel switch cutout. I wanted to save the cutout for my future upgrade to a 5-speed and the factory switch.
The compressor switch would go between the rear deck switch and the dash dimmer switch.
A Dremel with a cutoff wheel set to 25% speed made quick work of the big cuts without too much melting. A utility knife with a sharp blade let me finish the job. I cut the hole slightly undersized and used the utility knife to sneak up on the right height and width of the hole. The switches are nice and snug.
BTW - install the switch faceplates LAST. After EVERYTHING is done and tested. I did and boy was I glad I did!
We routed the wires through the ECU grommet in the firewall, along with every other wire we've routed into the cab from the engine bay, then across the dash. There was even a few feet left.
The dimmer switch is pretty wide behind the dash and needed to be rotated 90 degrees. Since it's clocked by a pin that goes into a hole, we had to recreate the hole. Rather than pull the lower dash panel completely out, I heated up a small screwdriver and punched the hole, careful not to go all the way through.
After that, there was a plastic brace that needed trimming to allow the compressor switch the depth it needed.
It took a few hours, but it looks really good.
While I tried to locate the dimmer wire for the dash, the only one I could find was the ground, which worked in reverse (bright dash, low power, dim dash, high power). I was hoping to dim the switches with the dimmer. It turns out they're not too bright, which is really nice. I can't stand distractions at night like bright switches.
One thing I found was that there's some kind of interlock and I can't engage the front locker by itself. I have to turn on the compressor, the rear locker, then the front locker. I'm OK with that, so I'm not going to try to figure out how to bypass that yet. Worst case, in the boonies, I just swap solenoid leads on the compressor if I want to lock the front by itself for some reason.
By Thursday, we were ready for the weekend's work on lifting the rear and clearancing the arms for the wider tires.
Monday, August 15, 2011


Sunday morning - time to do the front of the truck...
This morning, here's what's left to pull off
- swaybar
- brake lines
- axle shafts (gotta pull the c-clip in the hubs)
- 2 bolts holding the 3rd member in
Oh, and putting all this stuff back on.
We're watching monster trucks on TV while we wait for it to get late enough the air tools and radio won't aggravate the neighbors. 20 more minutes.
Before I go anywhere with the truck, I need the airlines attached to make sure we keep crap out of the air line bulkhead fittings. Our earlier drive used a zip tie and a nitrile glove, but I'm not good with that as a solution for much further than the first break-in run.
All right, the Blazeland portion, and the front gears/ARB are installed as of today. More details later, but I am totally shagged. I am no longer the young pup I once was. Good thing my son helped so much. He did a LOT on truck, really helping make it come together.
With 285/75R16s on stock Toyota steelies, the Blazeland hit at full stretch. A lot. And get much worse when turned. It wouldn't take more than a few feet to carve a big gash in the sidewall.
I took a grinding wheel to the edge of the upper control arm, making it flush with the uprights that go to the lower plate on the upper control arm. Pics later. The edge of the plate is now flush with the washers of the outermost plate bolts (gold), and matches the angle to the 2 upright pieces of plate going down to the lower plate.
That keeps it from hitting the tire at full droop with them pointed straight ahead. Barely. Like maybe by 1/8"
Any turning, tho, and I won't have a sidewall as the tire gets forced into the corners of the plate (front or rear). It only takes a few degrees.
I'm really prefer not to do spacers and I'm not considering a wider offset wheel for a couple of reasons. I'd need like 2" more offset, and that's quite a bit.
Sitting on the ground at the ride height I've chosen, there's plenty of clearance. I'll be taking a look at it next weekend to see what other options I might have.
There's no way to make the stock swaybar work, so I'll have to look into other options.
No driving until it gets align, which I'll probably do after I get the rear up. Lifting the rear is my priority, I can always just put some limiting straps on it to keep the tire sidewall from getting carved.
The used torsion bars I bought had the adjusters locked on. In the background are the used Blazeland arms.

I could wiggle them, but could not hammer them off with a dead-blow or with a sledge. And since I don't have a press...
I drilled out the backs (there's a pinhole there to let air in which provided the guide)
The wet shorts, btw, is sweat and water I poured over my head. It was very hot when I did this and, now that I'm 41 with a long term desk job, I sweat very easily.

While I don't have a press, I do have gear pullers. Which is what I needed the hole for.

And the torsion bar came free! That's sand. Lots and lots of sand. The PO had not left the rubber caps on the torsion bar, and they packed up. Needless to say, I reused the caps from the old torsion bars!

Pulling the control arms and front diff in the driveway in the heat was a lot of work considering there may not be more than 30 bolts which need to be pulled.

This is what most of the front diff oil on the ground looks like. The front diff fell off the jack and flipped the oil pan upside down. It did not speed up the operation.

A little Dawn and a whole lot of scrubbing with a push broom when I was done and you can't even tell oil was spilled there. Whew!!
As I mentioned, my phone went missing with a lot of pictures. Take my word for it, it went back together that day. It was a long day, but well worth it.
When it was done, we had both sets of gears swapped out, the front lifted and new balljoints installed, but with a clearance problem at full droop with the wide tires, and the rear drooping since it was at its stock, sagged height.
That was the end of Sunday.
Time to put the lift on!
The last parts I was waiting for arrived!
During the build, between weekends, my phone went missing, along with a whole lot of pictures. I'd uploaded a few to Facebook and G+, so I'll be able to reuse those here.
After all the research, I decided a Blazeland long travel kit coupled with a 'Zuk rear coil mod to the rear would provide the best bang for the buck while still meeting my design goals. I'll eventually replace the rear with leafs, and may replace the fronts with Total Chaos uniball units when I go to high-end shocks, but for the near term, this setup should let me learn more about what I do and don't like while I keep upgrading the other parts of the truck.
Front setup
Rear setup

During the build, between weekends, my phone went missing, along with a whole lot of pictures. I'd uploaded a few to Facebook and G+, so I'll be able to reuse those here.
After all the research, I decided a Blazeland long travel kit coupled with a 'Zuk rear coil mod to the rear would provide the best bang for the buck while still meeting my design goals. I'll eventually replace the rear with leafs, and may replace the fronts with Total Chaos uniball units when I go to high-end shocks, but for the near term, this setup should let me learn more about what I do and don't like while I keep upgrading the other parts of the truck.
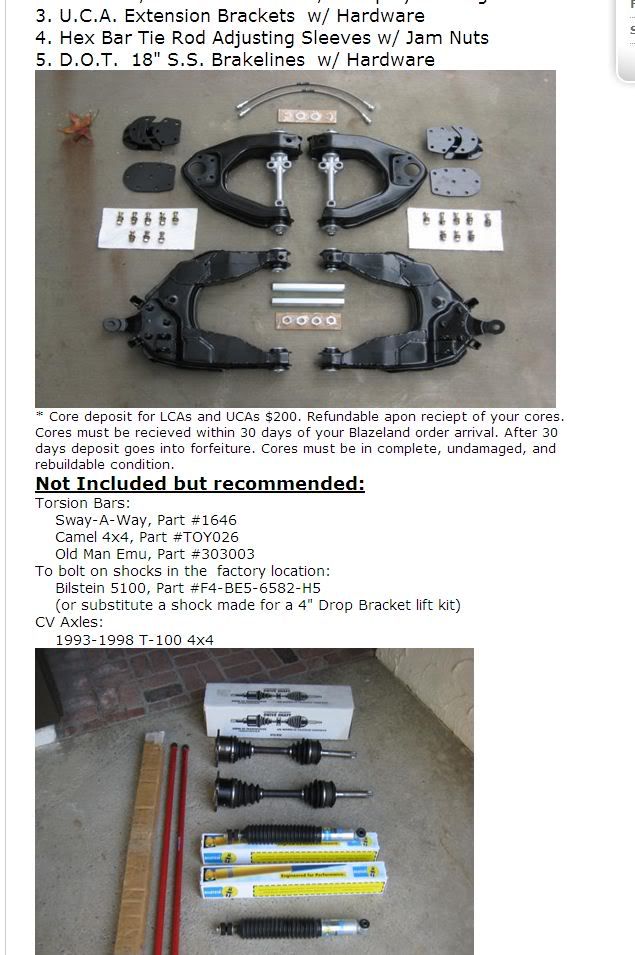
Here's what the Blazeland kit comes with. Used, I had less to start with, so needed a few more parts.
- I bought the Blazeland control arms and tie-rod extensions used from an inmate. It turned out they were the original style and the newer ones are set up to allow clearance for wider tires. More later.
- I found the torsion bars used on Craigslist.
- Balljoints were new Moog units.
- Axleshafts were reman units from CarQuest. I was time-constrained or I would have bought the new ones, but they were about a week out. I'll buy one new one and carry it as a spare.
- Brake lines were part of a Trail Gear lift package of brake lines - 1 rear, 2 fronts
Rear setup
- 14" x 125# Black Magic springs
- Rear brake line
- 2 fence base plates from a local metal fab shop to use as upper spring mounts
At the same time, I was installing new 4.88s and ARBs to match the 33" tall TreadWrights (285/75R16). A lot of the parts came from Davez Offroad Performance. They're a small shop so their turnaround isn't overnight, but they come recommended. Additionally, his pricing was strong right out of the gate. I hate having someone throw me near MSRP, then drop their price when I tell them I've been shopping around. Just give me a fair price from the get-go.
I was feeling under the weather the Saturday I started, so I didn't get started until about 1PM with anything. SWMBO's truck needed an oil change, and I needed to mess with the pool filter. But no way I was going another weekend without at least getting the gears installed. And how much more work would a couple of control arms be, anyways?
My 11yo son, Andrew, was ready to help. He's constantly tinkering with his bicycles, moving things from one to the other, so he's always a help.
We started by fixing one of the jack stands. Its ratchet-mech shield had broken off the last time we used it. I broke out the welder, and Andrew welded the left side of the shield after I showed him how to weld the right side. It's amazing how the paint on that orange thing flamed up. :)
Since the rear diff was the easiest, we started with that.
Andrew jacked up the truck, put it on jackstands, and pulled off the rear tires while I drained the rear pumpkin and pulled the driveshaft.
The truck ate the last set of front pads I'd put on it. This usually means the rear brakes aren't doing much.
When I got the rear drums off, I found the shoes had a lot of material, but the material had a lot of heat cracking. Which was a surprise since the drums looked great and didn't have any heat marks at all, or any scoring. Cheap shoes was my best guess. I'm going to put rear discs on here as soon as I get the $$ for a full-float kit (so I can flat-tow it), but I'm a big fan of good-working brakes, so that wasn't going to do.
One surprise when removing the axles was that I had to disconnect the rear brake lines since the backing plate is sandwiched between the bearing and the flange. I'm used to Ford 9" semifloats where you go through the axle flange to remove the nuts and the backing plate is separate from the axle assembly.
For 223K miles, the gears in the rear 3rd looked great. The fluid came out in decent condition with very little metal on the drain plug. The original owner took great care of this truck. I checked the splines on the axle shafts, and they were straight and in great shape. Awesome.
The new carrier is a V6 carrier. My truck is a turbo and the 3rd casing has the same extra ribbing found on the V6 carrier. Given my build goals, having beef is part of the plan. Extra $$, but worth the peace of mind.
It was a snug fit getting the new carrier into the housing. I went slowly and easily as the last thing I wanted to do was damage the copper air line for the ARB. With some gentle persuasion and careful twisting, it snicked into place.
Air tools are a godsend when you're faced with that many nuts and bolts, and it was quickly secured. We pushed the axles back in, secured the backing plates, and attached the brake lines.
Next up was to attach the driveshaft. Err, the flange bolt pattern is bigger than my driveshaft's. Well, that's not good.
I considered swapping flanges, but really didn't want to mess with the staked pinion nut (I hate reusing those and prefer a new one), and then I figured I'd have to make sure I had the preload right, and then, and then...
While tinkering with it, I realized the driveshaft self-centers in the flange. Ooohhh... This'll be easy!
I found that I did not have the 25/64th (9.9 mm) drill bit I needed. And I needed rear brake shoes anyways.
Since SWMBO and the girls were out shopping/working with the oldest's car, we rolled the rear tires into the garage, tossed the tools in there too, and headed for town in SWMBO's truck. Since it's nice, we cleaned up. A bit. Sorta.
True Value had a nice and expensive drill bit.
Carquest had some cheap shoes that I liked.
I already had plenty of brake fluid and brake cleaner
We were missing something... Ah, lunch! We didn't have lunch!
By now it was about 4 and Andrew had been doing a great job so I decided to treat him, so off we went.
When we got back, we both crawled under. While I worked on the flange, Andrew filled the rear diff.
I decided to offset the new holes 45 degrees from the existing holes in the flange, so I marked the first hole and drilled it. The driveshaft seated nice and snug in the center hole of the flange, enough I'd have to work it out.
Even so, I ran a bolt into the first hole, marked the second hole (the one directly across from the bolt), spun the shaft back over to the bolt, and pulled the bolt. Just as I set the bolt and air-ratchet on the ground, "CLONG!" went the driveshaft as it came loose from the flange and dropped on my right eyebrow. Oww. I squirmed for a few seconds, then started cracking up. Andrew generously didn't start laughing until he was able to determine which way I was going with it. At nearly midnight, I had a nice goose-egg.
I would not be making this mistake again... LOL And, sure enough, the driveshaft would not longer sit in the flange by itself. Three more holes and the rear driveshaft was on. Sweet!
Next, we swapped on the new brake shoes. Andrew has only experienced disc brakes, so this was his first set of drum brakes. He had to put his back into it to get the spring retainers off the locating pins.
I'd forgotten how intricate Toy rear drums were with the horseshoe clip for the eBrake lever, and the way they route their springs makes it so my brake spring tools don't work. Good thing I have a great set of pliers for that with tiny teeth that don't hurt the springs.
When we moved to the driver's side, we found the backing plate adjustment hole plug was missing, which had allowed more sand than desired into that side. That sand found its way in there from our trip through Pinyon Canyon on a rainy day, where we splashed through miles of wet sand wash. I wish I had better pics, that trip was AWESOME. I'm totally doing that again next wet season. This time, no strap will be required... for us!
Next up was bleeding the brakes.
I was surprised, and a bit shocked, to find the master cylinder nearly empty. I'd seen the right rear dripping the whole time into the oil pan, but I really expected that the master cylinder would be separated between front and rear. I'll need to check to see what happens when one end leaks. All my Chevy's have seperate master cylinder wells so if one end leaks, the other end is unaffected.
Once the brakes were bled until the fluid ran clear, it was time to throw on the rear tires, drop it, and go.
"go" included cleaning up the tools and putting them back in the garage for a bit. Most of the meta shavings were on a couple of paper towels I'd put down, making it easy to toss them in the garbage.
With 4.88s and 285/75R16s (33s), the GPS told us the speedo was once again accurate. A nice side-effect was that OD was once again useful at speeds under 80mph.
No whines. No vibrations. No grinding feelings. No leaks. Success!!
To add a little icing, the brakes actually worked well again!
We racked up about 40 gentle miles, then ran back home as the sun was setting and the colors were dulling.
The next step was to clean up the remaining metal shavings. Out came the shop vac since a broom is not always effective with those little metal bits. As it was, I ended up with one in my heel (I often work barefoot). It came out at the end of the evening with a very minor assist from a needle.
Since it was going to be best hold the truck up by the frame, out came the big jackstands. I have a pair of these I use every once in a blue moon. I hate to store them in between, but have zero complaints when I need them.
Andrew jacked it up again and we set the stands on the frame. Andrew took off the front wheels while I laid out all the parts to make sure nothing was missing.
Hmmm... that was a lot of parts.
First up was relaxing the torsion bars. Passenger side, break the jam nut loose, add some impact wrench (Shhhh! No, you're not supposed to!), and brrrrrrr-ziiiiiii, it was off.
The driver's side has the cat running by it. It was still a mite warm, but not super-hot by now. The cat on this thing cools off pretty well. The muffler stays hot however. The shop who'd rebuilt the motor had, for some reason I'm still not sure of, removed the muffler heat shield when doing the 2.5" exhaust, causing the rear driver's seat to melt. Keep those shields up, Scotty!
The cat was still hot enough that if I kept my hand on it for more than a couple of seconds, it was time to take it off. And the jam nut on this side was ON. Wrench here, wrench there, puulllll! Nothing. To top it off, the edge of the heat shield for the cat is right where your hand will go when it breaks loose, probably opening it up.
To make things worse, it was now dark and still a bit warm under the truck, I was sweating so much my head-light wouldn't stay on my head. Andrew held the LED mini-mag on the nut while I worked on the problem. That's a pretty bright little torch.
The only way to tell the jam nut from the holding nut was the faint line between them as their flat edges were perfectly aligned. I could turn the bolt by hand and hold both nuts with a wrench against the frame, but that was sooo hard on the bolt I really didn't want to go the 2"+ that way. Plus I hadn't had my Wheaties, so it was going to wear me out. If this was my last resort, I would definitely not use the impact gun on it. That sucker puts out more than 600 ft/lbs at max setting, I wouldn't notice something was going wrong until it was way wrong.
Finally, I got smart and put a wrench on the bottom nut, braced it to the frame, and TIGHTENED the bolt with the air hammer (set to 2 of 5, which is about 80-90 ft/lbs). After a brief fight, the jam nut stayed where it was while the bottom nut moved away from it. Move the wrench to the jam nut, and the bolt was in my hands seconds later. Hoorah! Man, that took a while.
I used to be a lot faster, but nowadays I sit behind a desk and hold down a chair for hours on end.
For giggles, we found a yellow crayon and marked the control arm shims. Off came the bottom control arm bolts, the top control arm bolts, the steering arm adjusters, the front shocks, driveshaft (since the swaybar acts as a d-shaft hoop, no worries about getting clonked on the head!).
Around then we called it a night, put the tools and parts in the garage, closed up, and took a shower, cleaning up the thick grease off our arms and legs (shorts, of course!). By now it was about 10pm.
Monday, July 11, 2011
While I'm in here, that radio has been annoying me...
So I was on quite a roll this evening. I got my blower motor working, I got my AC problem narrowed down. I need a couple parts for the turbo, so while I'm waiting, I decided to tackle the radio.
I had gotten quite a windfall of parts in September of '09 from someone who was parting out his truck for Cash4Clunkers. His was real nice, I felt bad. But I feel good about the parts I saved from the wreckers. :) What's amazing about this blog is the timeline. I can't believe how long I've had this truck and how little I've done. It really speaks volumes for where my priorities have been.
One of the things I got was his radio out of his truck. I liked it because it was decent, but not desireable. Since the top comes off the truck, the last thing I want is people breaking the dash up to steal stuff.
The one that was in my truck is a 1998 Pioneer, just like the one I put in my '81 Honda Prelude around then. The front was grimy from the PO (see the link above for the condition of the carpet). The left speaker worked intermittently, and the crackling wasn't pleasant. It's a good deck, this one had just seen far better days. It MAY get transplanted to our Rhino if not tossed outright. The deck in there got caught in a sandstorm and quit working.
When I got the truck, the radio was in its hole, cockeyed. As part of making up all hte issues, the shop that rebuilt my motor had "fixed" my deck. It definitely was straight, and it definitely looked better.
So you can imagine my surprise when I pulled the deck out and found the wires were an outright mess. Some taped, some with wire nuts, some just twisted together. Not the worst wiring job I've seen, but a definite runner-up. The plug for the deck had a screw rammed into it, why, I don't know since the clip works fine.
Happily, they didn't butcher the factory harness, instead using an adapter, allowing me to unplug the absolute mess and plug in the new deck and harness. Click/snap, done!!
While I was in there, I found one more fuse and relay behind the radio at the transmission tunnel/firewall junction (wondering if it's for the rear heater). Toyota put fuses everywhere in their trucks, man!
While I was under the dash, I noticed the RCA cable was routed over the brake pedal rod (no, really) and came down near the gas pedal. I rerouted it over the AC ducting, getting another 5", making it easier to put the deck back in. The cable no longer goes to anything, it looks like a PO swapped out a lot of the nice stuff in there before selling it.
A quick 20 minutes and I had a new-to-me deck installed and ready to go. Even better, both speakers are working and sound fine. The deck is about 7 years old, but it works well and sounds nice. And it's not fancy enough someone will want to steal it.
It doesn't put out nearly as many watts as the Pioneer (about 1/2), I'll see how it sounds next time I drive it. Here's hoping it's OK. If not, another candidate for the Rhino and the sand gods!
I had gotten quite a windfall of parts in September of '09 from someone who was parting out his truck for Cash4Clunkers. His was real nice, I felt bad. But I feel good about the parts I saved from the wreckers. :) What's amazing about this blog is the timeline. I can't believe how long I've had this truck and how little I've done. It really speaks volumes for where my priorities have been.
One of the things I got was his radio out of his truck. I liked it because it was decent, but not desireable. Since the top comes off the truck, the last thing I want is people breaking the dash up to steal stuff.
The one that was in my truck is a 1998 Pioneer, just like the one I put in my '81 Honda Prelude around then. The front was grimy from the PO (see the link above for the condition of the carpet). The left speaker worked intermittently, and the crackling wasn't pleasant. It's a good deck, this one had just seen far better days. It MAY get transplanted to our Rhino if not tossed outright. The deck in there got caught in a sandstorm and quit working.
When I got the truck, the radio was in its hole, cockeyed. As part of making up all hte issues, the shop that rebuilt my motor had "fixed" my deck. It definitely was straight, and it definitely looked better.
So you can imagine my surprise when I pulled the deck out and found the wires were an outright mess. Some taped, some with wire nuts, some just twisted together. Not the worst wiring job I've seen, but a definite runner-up. The plug for the deck had a screw rammed into it, why, I don't know since the clip works fine.
Happily, they didn't butcher the factory harness, instead using an adapter, allowing me to unplug the absolute mess and plug in the new deck and harness. Click/snap, done!!
While I was in there, I found one more fuse and relay behind the radio at the transmission tunnel/firewall junction (wondering if it's for the rear heater). Toyota put fuses everywhere in their trucks, man!
While I was under the dash, I noticed the RCA cable was routed over the brake pedal rod (no, really) and came down near the gas pedal. I rerouted it over the AC ducting, getting another 5", making it easier to put the deck back in. The cable no longer goes to anything, it looks like a PO swapped out a lot of the nice stuff in there before selling it.
A quick 20 minutes and I had a new-to-me deck installed and ready to go. Even better, both speakers are working and sound fine. The deck is about 7 years old, but it works well and sounds nice. And it's not fancy enough someone will want to steal it.
It doesn't put out nearly as many watts as the Pioneer (about 1/2), I'll see how it sounds next time I drive it. Here's hoping it's OK. If not, another candidate for the Rhino and the sand gods!
AC is intermittent...
My AC has been intermittent since I got the truck. It works, it doesn't work. It's been annoying, especially when it's truly hot and humid out, like when we were in Houston (it played toad behind the motorhome after disconnecting the rear driveshaft).
Not long after the new engine, I had the AC converted to R134a.
Lately, the AC hasn't worked at all. I used to be able to get it to come on about every 2nd-10th try. Guessing that a borderline part had finally given up the ghost, and with the heat of summer coming, especially when you get out to the desert surrounding San Diego, it was time to fix it!
I tell you, troubleshooting issues is so much easier with forums and with Google than it used to be. I searched around and learned some things it could be.
A quick note for anyone troubleshooting electrical problems. You need both a meter AND a test light.
Meters are awesome. I spent about an hour one day troubleshooting my sister's 1981 Celica and why the headlighs wouldn't work when they had 12v running to them (13.6 actually). Scratching my head. Taking more readings. Scratching my head some more. Finally I broke out my test light and tested a headlight connector. The problem was immediately noticeable as it barely lit up. Following the wires back to the connector at the battery showed a wire that had corroded nearly all the way through in a hard-to-spot way, 2 meager strands providing the 12v it took to fool my meter into thinking all was well.
The FSM (Factory Service Manual) is a must for anyone working on this stuff. This one is a 1988 version instead of 1987, but usually that's close enough! The wiring diagrams in books like these are great, but what's missing is... where is that silly relay/connector/fuse block/switch/etc. actually located on the truck! I have a Haynes to go with the FSM.
So... back to the AC.
In my case, the AC button lights up, but nothing happens. The fact it lights up at all was a little weird I thought, but it turns out it seems to just mean the button is pushed in.
Since getting the switch out looked to be a pain, and it lights up 100% of the time it's depressed, I figured I would start with the AC relay. Hopefully it was easier to get to and I could check for current from the switch with my handy-dandy test light.
The AC relay is directly behind the glovebox, on top of the evaporator housing, just to the right of centerline (unlike the left a forum post had indicated - that's the AC Amplifier). The glovebox was easy to get behind, pulling down the flap (gently!) and popping the box itself down past the left and right catches (gently again!). When I flipped the switch on and off, the relay clicked merrily. Hmm.... That's good, but not for me. :)
I borrowed this picture from 4Crawler
The little black button is the light switch for the glovebox.
He's marked the AC low pressure switch connector.
The connector below it is for the thermistor.
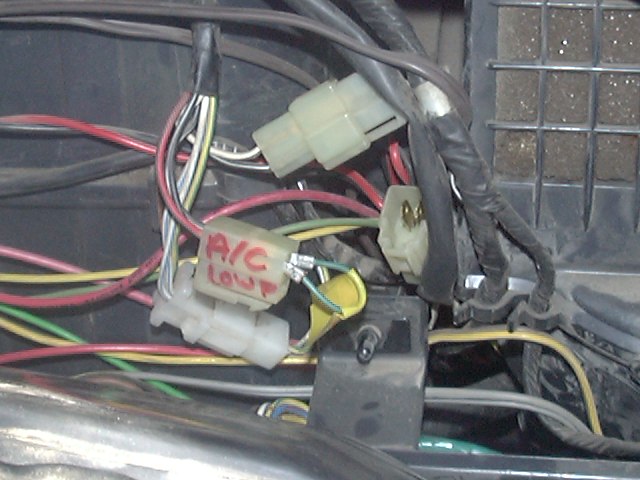
My thermistor connector was jammed behind the glovebox switch, wearing through the white/blue wire's insulation and causing a short. Since no fuse was damaged, and looking at the wiring diagram, it appears to be on the ground-side. However, it could certainly explain the intermittency since it runs back into the AC Amplifier at that point. The AC Amp controls compressor lockup.
I taped the wire up, then moved the connector up higher and used some of the wire clips available to keep it there.
Unfortunately, that did not change the behaviour - the compressor still wasn't coming on.
Well, the low pressure switch is right there, let's check it. Hmmm, power to only one side (red wire, incoming).
I pulled a cap off the compressor and just touched the schrader valve. Nothing. Held it down. Nothing.
The system is totally empty (standard pressure). Crap, time to find the leak... It's been converted to R134, so it'll be easy to rectify once I've sorted out the leak. When it was converted, it held vaccum and worked for over a year, so this is a new problem.
Hopefully it's not the compressor (cha-ching!!).
It wasn't a total loss, I got to tear into the truck a bit and learn more about it.
At the same time, I found the heater and AC fuses behind the dash. No, really. Not hard to get to, but you have to pull the glovebox out (2 minutes) to get to them.
Not long after the new engine, I had the AC converted to R134a.
Lately, the AC hasn't worked at all. I used to be able to get it to come on about every 2nd-10th try. Guessing that a borderline part had finally given up the ghost, and with the heat of summer coming, especially when you get out to the desert surrounding San Diego, it was time to fix it!
I tell you, troubleshooting issues is so much easier with forums and with Google than it used to be. I searched around and learned some things it could be.
A quick note for anyone troubleshooting electrical problems. You need both a meter AND a test light.
Meters are awesome. I spent about an hour one day troubleshooting my sister's 1981 Celica and why the headlighs wouldn't work when they had 12v running to them (13.6 actually). Scratching my head. Taking more readings. Scratching my head some more. Finally I broke out my test light and tested a headlight connector. The problem was immediately noticeable as it barely lit up. Following the wires back to the connector at the battery showed a wire that had corroded nearly all the way through in a hard-to-spot way, 2 meager strands providing the 12v it took to fool my meter into thinking all was well.
The FSM (Factory Service Manual) is a must for anyone working on this stuff. This one is a 1988 version instead of 1987, but usually that's close enough! The wiring diagrams in books like these are great, but what's missing is... where is that silly relay/connector/fuse block/switch/etc. actually located on the truck! I have a Haynes to go with the FSM.
So... back to the AC.
In my case, the AC button lights up, but nothing happens. The fact it lights up at all was a little weird I thought, but it turns out it seems to just mean the button is pushed in.
Since getting the switch out looked to be a pain, and it lights up 100% of the time it's depressed, I figured I would start with the AC relay. Hopefully it was easier to get to and I could check for current from the switch with my handy-dandy test light.
The AC relay is directly behind the glovebox, on top of the evaporator housing, just to the right of centerline (unlike the left a forum post had indicated - that's the AC Amplifier). The glovebox was easy to get behind, pulling down the flap (gently!) and popping the box itself down past the left and right catches (gently again!). When I flipped the switch on and off, the relay clicked merrily. Hmm.... That's good, but not for me. :)
I borrowed this picture from 4Crawler
The little black button is the light switch for the glovebox.
He's marked the AC low pressure switch connector.
The connector below it is for the thermistor.
My thermistor connector was jammed behind the glovebox switch, wearing through the white/blue wire's insulation and causing a short. Since no fuse was damaged, and looking at the wiring diagram, it appears to be on the ground-side. However, it could certainly explain the intermittency since it runs back into the AC Amplifier at that point. The AC Amp controls compressor lockup.
I taped the wire up, then moved the connector up higher and used some of the wire clips available to keep it there.
Unfortunately, that did not change the behaviour - the compressor still wasn't coming on.
Well, the low pressure switch is right there, let's check it. Hmmm, power to only one side (red wire, incoming).
I pulled a cap off the compressor and just touched the schrader valve. Nothing. Held it down. Nothing.
The system is totally empty (standard pressure). Crap, time to find the leak... It's been converted to R134, so it'll be easy to rectify once I've sorted out the leak. When it was converted, it held vaccum and worked for over a year, so this is a new problem.
Hopefully it's not the compressor (cha-ching!!).
It wasn't a total loss, I got to tear into the truck a bit and learn more about it.
At the same time, I found the heater and AC fuses behind the dash. No, really. Not hard to get to, but you have to pull the glovebox out (2 minutes) to get to them.
The blower only blows on the last 2 positions.
Ever since I bought my 4Runner, the blower only worked on positions 3 and 4. 1 & 2 were nonfunctional. Like everyone, I assumed it was going to be the switch. The thought of tearing into the dash wasn't exciting me, so I kept putting it off.
It turns out it's an easy fix for the 4Runner. Toyota wanted around $30 for the part, local parts store as cheap as $10.xx. I went with that option. Plus they're local!
4Crawler's site has provided a wealth of information. May it never go offline. Here's the hot tip on replacing the blower resistor.
It's tucked up in front of the blower motor, getting the screw back into it was a bit of a chore. I had the old one in my hand in about 2 minutes. It took me about 10 to work the screw back in and make sure the resistor was properly seated.
Ahhh, now my blower blows on 1 and 2!
It turns out it's an easy fix for the 4Runner. Toyota wanted around $30 for the part, local parts store as cheap as $10.xx. I went with that option. Plus they're local!
4Crawler's site has provided a wealth of information. May it never go offline. Here's the hot tip on replacing the blower resistor.
It's tucked up in front of the blower motor, getting the screw back into it was a bit of a chore. I had the old one in my hand in about 2 minutes. It took me about 10 to work the screw back in and make sure the resistor was properly seated.
Ahhh, now my blower blows on 1 and 2!
The turbo goes loose... again.
Well, the lift and lockers are on hold as the truck is not driveable. Oh, sure, if the monsters were chasing me or a monster earthquake happened, but an exhaust leak has the opportunity to screw up some of my hoses and wiring, so it's going to stay parked.
My turbo has gone loose again. You can tell it's coming loose because it start squalling in a "I need a bearing!" kind of way. That's really just air leaking by the exhaust manifold/turbo junction, as it got looser on the ride home, it quit squalling and the sound of a massive exhaust leak took over. Boost plummeted to 3 bars on the gauge.
Last night I dug into it a bit. For a newly rebuilt motor and turbo, this thing sure has a lot of oil leaks. :(
The turbo lost one stud, the other 3 range between loose and very loose. The exhaust pipe to turbo has a nut that would have come off if it had the room to do so. The exhaust manifold had a stud underneath that might have been hanging on by a thread at most.
I have a feeling I'll be retightening just about every bolt that shop touched (intake side was already done by another shop - scan down for that saga). Since the machine shop, which has a solid reputation, did the bottom end, I'm not worried about a connecting rod coming loose. And I retorqued the head bolts when I put in a new cam, so I know those are good.
Since my phone is not grease-proof, I may not get a lot of pictures.
The upside is that I'll be happy with how well it runs when I'm done!
The upside is that I'll be happy with how well it runs when I'm done!
Subscribe to:
Posts (Atom)